
TL;DR:
- Prompt action significantly improves stain removal success by preventing deep-set damage and embedded contamination. Using the appropriate tools and products for each surface ensures efficient cleaning while avoiding accidental harm to your vehicle. Consulting professional detailers offers hassle-free, long-lasting results, especially for stubborn stains or challenging conditions like the Sunshine Coast climate.
That sinking feeling when you spot a coffee ring on your seat or bird dropping baked into your bonnet is one every Sunshine Coast driver knows. Stains are inevitable, but they don’t have to be permanent. Whether it’s red mud from Noosa hinterland tracks, sunscreen on the headrest, or saltwater residue after a beach day at Mooloolaba, the right technique and a fast response make all the difference. This guide walks you through exactly what tools you need, how to treat each stain type, and when to call in a professional mobile detailing team so your car stays looking its best without eating into your busy schedule.
Table of Contents
- What you need to remove stains from your car
- Step-by-step: Removing interior stains (upholstery, carpet, plastics)
- How to tackle exterior stains: Paintwork and windows
- Troubleshooting stubborn stains and edge cases
- How to keep your car stain-free: Maintenance tips
- What most guides miss: Why stain removal is about time, not effort
- Get help from Sunshine Coast detailing pros
- Frequently asked questions
Key Takeaways
| Point | Details |
|---|---|
| Act fast on stains | Immediate action makes stain removal up to 80% easier and prevents permanent damage. |
| Choose the right products | Using purpose-specific cleaners and testing on inconspicuous areas keeps your car safe from harm. |
| Exterior stains need extra care | Clay bars, tar removers, and waxing protect paintwork and prevent recurring marks. |
| Don’t ignore persistent stains | Stubborn stains often signal it’s time to escalate to professionals or special cleaning methods. |
| Preventive habits pay off | Regular maintenance and quick cleanups keep your car looking spotless with minimal effort. |
What you need to remove stains from your car
Before you start scrubbing, getting your kit together is half the battle. Walking out to your car with the wrong product wastes time and can make stains worse. Knowing what to grab first sets you up for success every single time.
Essential tools and products
Here’s what a well-stocked car cleaning kit looks like for Sunshine Coast conditions:
- Microfibre cloths (at least four; two for blotting, two for buffing)
- Soft-bristle detailing brush for agitating carpet fibres and seat seams
- Wet and dry vacuum or a handheld car vacuum with upholstery attachments
- pH-balanced upholstery cleaner for fabric seats
- Leather cleaner and conditioner for leather interiors
- All-purpose interior cleaner (APC) for plastics, door trims, and consoles
- Clay bar kit for exterior paintwork contamination
- Tar remover for road grime and tar spots
- Automotive glass cleaner for windows and windscreens
- Detailing spray or quick detailer for the exterior between full washes
- Car wax or ceramic spray for protective finishing after stain removal
Understanding your interior care essentials before starting means you won’t reach for the wrong thing mid-clean.
| Product | Best use | Caution |
|---|---|---|
| pH-balanced upholstery cleaner | Fabric seats and carpet | Rinse thoroughly to avoid residue |
| Leather cleaner and conditioner | Leather seats and trims | Never use on fabric |
| Tar remover | Road tar on paintwork | Ventilate area when using |
| Clay bar | Embedded paint contaminants | Use with clay lubricant only |
| APC (diluted) | Plastics, consoles, door cards | Dilute to manufacturer ratio |
| Vinegar and water solution | Water spots on glass | Do not use on painted surfaces |
Pro Tip: Always test products first on a small, hidden area before applying to the main surface. This single habit prevents most accidental damage, particularly on leather and suede.
Sticking to products designed specifically for automotive surfaces rather than household alternatives is worth the small extra cost. You can explore top interior cleaning solutions to identify what works best for different Sunshine Coast vehicle types, from family SUVs to trade utes baking in the Queensland heat.
Step-by-step: Removing interior stains (upholstery, carpet, plastics)
With your products and tools ready, you can move into the actual cleaning process for your car’s interior. The order you work in matters just as much as what you use.
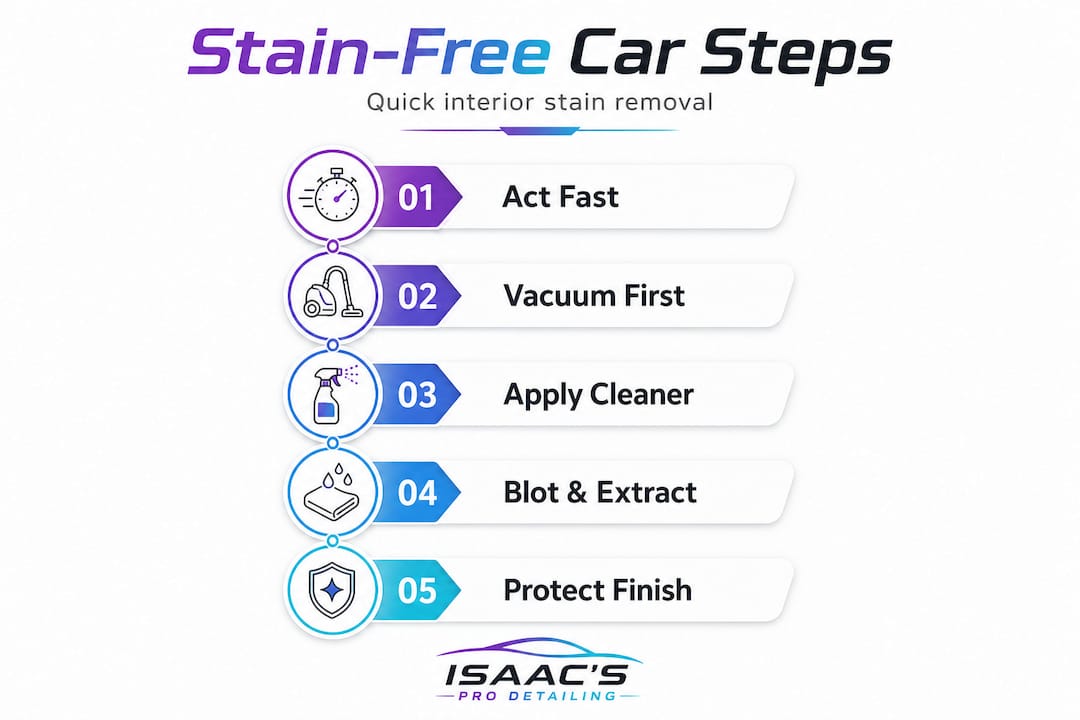
Step 1: Act immediately
Fresh stains are 80% easier to remove than dried, set-in ones. The moment a spill happens, grab a clean cloth and blot. Never rub. Rubbing pushes the stain deeper into carpet fibres and upholstery weave.
Step 2: Vacuum first
Before applying any liquid cleaner to carpet or seats, vacuum the area thoroughly. Loose debris, sand, and crumbs will turn into mud the moment liquid hits them. This step alone prevents countless re-cleaning headaches.
Step 3: Apply the right cleaner for the surface
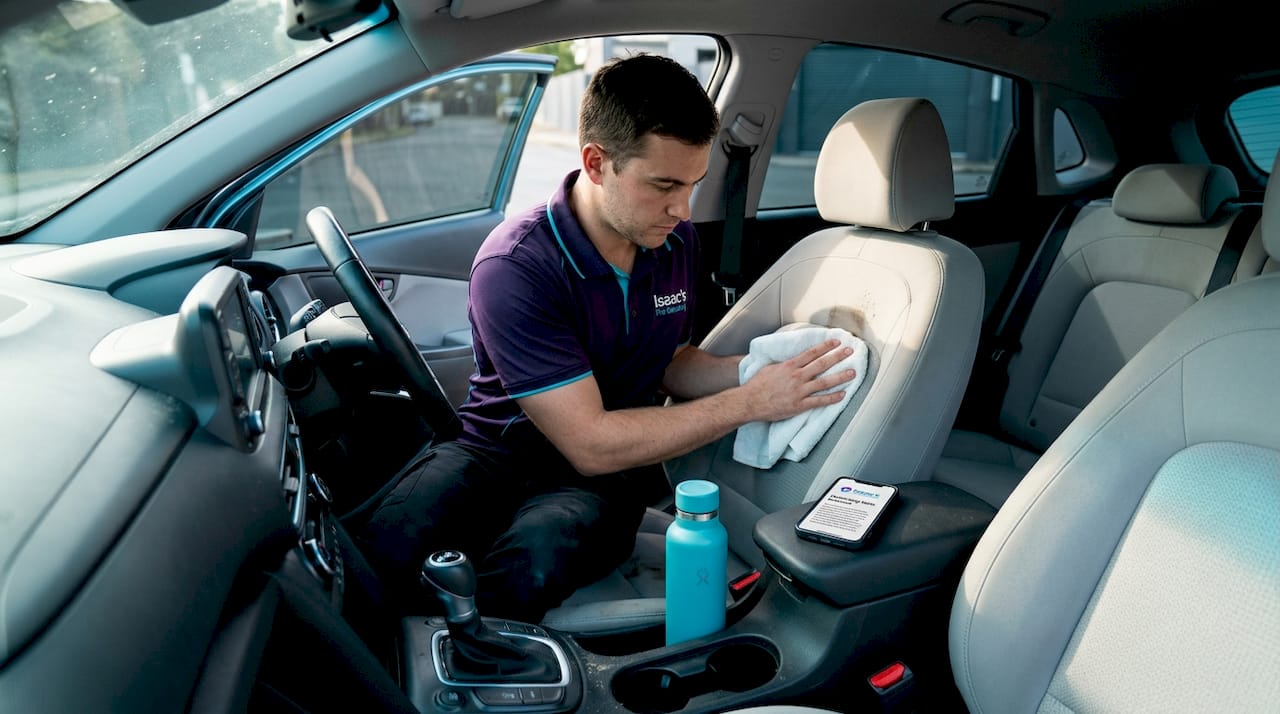
- Fabric seats and carpet: Spray a pH-balanced upholstery cleaner directly onto the stain. Work the product in gently with a soft-bristle brush using circular motions. Allow it to dwell for two to three minutes, then blot with a clean microfibre cloth. Repeat until the stain lifts.
- Leather seats: Apply a small amount of dedicated leather cleaner to a microfibre cloth rather than directly onto the leather. Wipe in gentle, overlapping strokes. Follow immediately with a leather conditioner to restore moisture stripped during cleaning.
- Plastics and hard trims: Spray your diluted APC onto a microfibre cloth (not directly onto the surface) and wipe down. For tight gaps and seams around buttons or vents, use a detailing brush.
- Floor mats: Remove mats from the vehicle entirely. Spray cleaner generously, scrub with a stiff brush, then rinse with a garden hose or pressure washer if possible. Hang them to dry fully before returning to the car.
Step 4: Extract moisture
Leaving moisture in carpet or seat foam leads to mildew and unpleasant odours. Blot repeatedly with a dry microfibre cloth, then allow the area to air-dry with windows open. In Queensland humidity, a small fan or car dehumidifier speeds this up.
“Blotting rather than rubbing and working from the outside of the stain inward stops the stain from spreading into a larger, harder-to-treat area.”
Following a clear set of interior cleaning steps keeps you from backtracking and missing spots. For tougher fabric challenges, the best interior cleaning methods include hot water extraction, which professional detailers use to pull embedded grime from deep in the fibres. If a stain covers a large area or has been sitting for more than 48 hours, upholstery stain removal tips from a professional service will save you from damaging the material trying to force the result yourself.
Pro Tip: For sunscreen stains on light-coloured upholstery (a very common Sunshine Coast problem), mix a small amount of dishwashing liquid with warm water and blot it in before rinsing. The surfactants break down the oily residue that most general cleaners struggle with.
How to tackle exterior stains: Paintwork and windows
Once the interior is spotless, it’s time to tackle the exterior, which is especially vulnerable given the coastal roads and subtropical conditions here on the Sunshine Coast. Salt air, flying insects, tree sap, and baked-on bird droppings are everyday realities.
Exterior stain types and treatments
Not all exterior stains respond to the same method. Here’s how to match the fix to the problem:
| Stain type | Recommended method | Finish step |
|---|---|---|
| Bird droppings | Soak with warm water, wipe gently | Wax or ceramic spray |
| Road tar | Dedicated tar remover, soak and wipe | Wax to protect |
| Tree sap | Diluted rubbing alcohol on cloth | Wax to reseal |
| Water spots (mineral) | White vinegar and water solution | Polish then wax |
| Embedded contaminants | Clay bar with lubricant | Wax to protect paint |
| Insect residue | Enzyme-based bug remover | Detail spray or wax |
The professional approach to paintwork follows a logical sequence: wash the vehicle first to remove loose dirt, then use a clay bar for embedded contaminants, apply tar remover for road tar, use diluted rubbing alcohol for tree sap, and finish with vinegar for water spots before always waxing the treated area.
- Start with a thorough two-bucket wash method to lift surface dirt before treating stains
- Work on one panel at a time to prevent products from drying in the sun before you can remove them
- Use a fresh, clean section of microfibre cloth for each product to avoid cross-contamination
- Never apply tar remover or alcohol-based products in direct sunlight
- Always finish with a coat of wax or ceramic spray to seal the surface and create a barrier against future contamination
A solid detailing workflow makes the difference between a clean car that stays clean and one that picks up new marks within days. Following a structured paint protection guide is especially valuable in the Sunshine Coast climate, where UV intensity is among the highest in Australia and paint degrades faster without proper care.
Statistic to note: UV radiation on the Sunshine Coast significantly accelerates paint oxidisation, which means unprotected, stain-treated panels fade and discolour much faster than those finished with wax or ceramic coating. Applying protection after every stain removal session is not optional; it’s essential.
Troubleshooting stubborn stains and edge cases
Even the best routine can hit a wall, so let’s look at what to do when stains simply won’t shift no matter what you try.
Signs a stain needs professional intervention
- The clear coat looks hazy or dull around a stain (likely etching from bird droppings or sap left too long)
- Fabric has changed texture or colour after repeated cleaning attempts
- A musty odour returns within days of cleaning, suggesting deep moisture and mildew
- Leather shows cracking or discolouration rather than recovering after conditioning
- Tar or sap has been sitting for more than a week and has bonded chemically with the paint surface
“When the clear coat is etched or burned through, polishing compounds and machine polishing are required to restore the surface. No amount of gentle rubbing will undo chemical damage.”
For these situations, pro detailing tips consistently point to one recommendation: stop and escalate. Applying stronger chemicals to an already damaged surface compounds the problem. The same logic applies to leather. Avoid harsh chemicals on leather at all costs; they strip protective coatings and can cause irreversible drying and cracking.
- Red flag: Using acetone, bleach, or undiluted alcohol on interior surfaces
- Red flag: Scrubbing painted surfaces with abrasive pads or steel wool
- Red flag: Using pressure washers directly on door seals or window rubbers
- Red flag: Applying interior cleaners to leather without checking the label
Pro Tip: If you’re unsure whether a stain is surface-level or has penetrated the clear coat, run a fingernail lightly across the edge. If it catches or you feel a texture change, the paint is damaged and needs machine polishing, not cleaning products. Checking out mobile detailing advice from a qualified detailer can help you assess before you attempt any further DIY.
How to keep your car stain-free: Maintenance tips
Once you’ve gotten on top of tough stains, staying ahead with a simple maintenance plan means you’ll spend far less time and money dealing with them in the future.
Practical prevention habits
- Keep a small detailing kit in your boot: two microfibre cloths, a small bottle of APC, and a stain-lifting spray
- Address any spill, splatter, or bird dropping the moment you notice it. Remember, fresh stains are 80% easier to remove, so a 60-second spot clean beats a 60-minute full clean later
- Apply fabric protection spray to seats and carpet every three to six months to create a water-resistant barrier
- Use seat covers for pets, children, or tradespeople riding in the vehicle regularly
- Apply a ceramic coating or quality wax to exterior panels every three months to prevent contaminants from bonding to the paint
Scheduled detailing as a long-term strategy
Booking a professional detail every three months is one of the smartest investments for vehicle longevity. A routine service catches early-stage staining, embedded contamination, and surface damage before it escalates into expensive repairs. Reviewing your vehicle maintenance tips and pairing them with regular professional attention keeps your car in resale-ready condition year-round.
On the exterior, following clear paint protection steps designed specifically for Sunshine Coast conditions ensures your panels resist the harsh combination of UV, salt air, and subtropical humidity that accelerates fading and staining.
Pro Tip: Set a calendar reminder every 12 weeks for an interior wipe-down and exterior spray wax. This 20-minute habit prevents the build-up that leads to hour-long, costly correction work.
What most guides miss: Why stain removal is about time, not effort
Most stain removal guides focus on products and technique. That’s useful. But here’s what gets overlooked consistently: the single biggest variable in stain removal outcomes is not what you use. It’s how quickly you act.
We’ve seen cars come in where the owner had tried every product in the hardware store on a coffee stain that had been sitting for three weeks. The effort was enormous. The result was mediocre at best and sometimes caused new surface damage from overworking the fabric. Contrast that with a driver who blotted a smoothie spill immediately with nothing more than a damp cloth and a bit of upholstery spray. Clean in under two minutes.
The uncomfortable truth is that most people delay because they hope the stain will somehow matter less later. It never does. It always matters more. A fresh spill has no chemical bond with the material. A week-old stain has polymerised into the fibres and, in the case of paint, may have begun to etch the clear coat. The chemistry is working against you the entire time you wait.
This matters particularly for busy families and professionals on the Sunshine Coast, where cars double as offices, surf trip shuttles, and lunch venues. The fix isn’t to be more careful about avoiding stains. It’s to build a fast-response habit so that action happens within minutes, not days.
Keeping a small kit in the car, knowing the two or three steps to take immediately, and understanding when to call in a professional rather than experiment further are the things that separate drivers who always have a clean car from those who feel like they’re constantly losing the battle. The detailing approach for busy families works precisely because it’s built around this fast-response model, not extended weekend cleaning sessions.
Speed beats strength every time. That’s the real lesson.
Get help from Sunshine Coast detailing pros
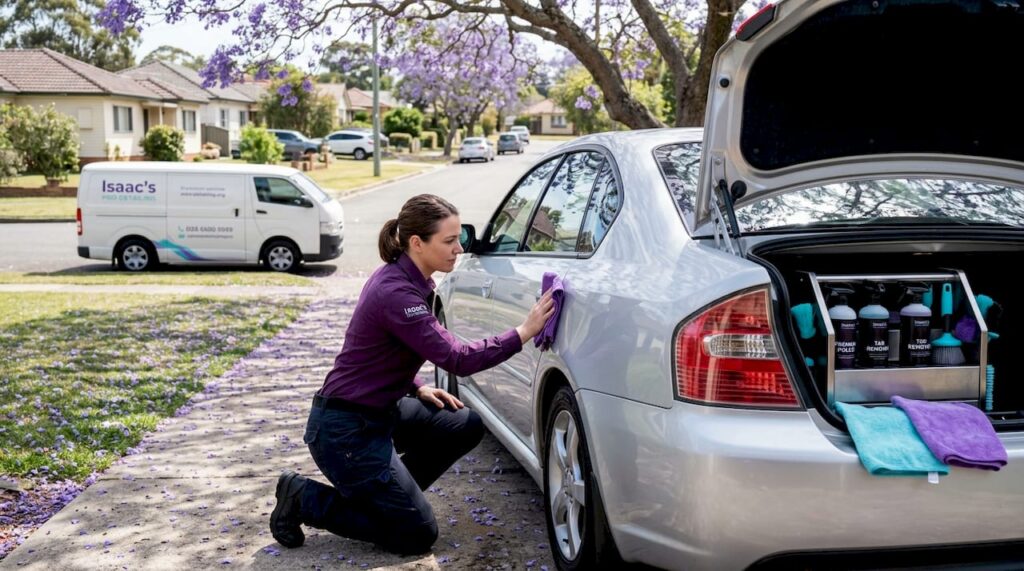
If you want truly hassle-free, showroom-worthy results without rearranging your weekend, local professional mobile detailers make stain prevention and removal effortless. Isaac’s Pro Detailing Sunshine Coast brings the full service directly to your home, workplace, or wherever your car is parked, saving you time and guesswork.
Our mobile detailing workflow is built around the real demands of Sunshine Coast life, from deep seat extraction after beach days to exterior decontamination for vehicles parked under gum trees. Whether you need a one-off stain treatment or a regular maintenance package, our team uses professional-grade equipment and eco-friendly products suited to Queensland’s unique conditions. Check out our car interior cleaning guide to see what a professional service covers, then get in touch with us to book or enquire. For the finishing touches that make a genuine difference, our professional detailing tips show exactly how we achieve results that last.
Frequently asked questions
What’s the fastest way to remove a fresh spill in my car?
Blot the spot immediately with a clean cloth and use an upholstery-safe cleaner. Fresh stains are 80% easier to remove, so acting within the first few minutes gives you the best chance of a clean result.
Are household cleaning products safe for car interiors?
Some can cause damage, so always test in a hidden area first. You should avoid harsh chemicals on leather or sensitive fabrics, as they can strip protective coatings and cause permanent discolouration.
How do I get rid of sap or tar stuck to my car’s paint?
Use diluted rubbing alcohol on a microfibre cloth for tree sap, and a dedicated tar remover for road tar, then always wax the treated panel to reseal and protect the paint surface.
What should I do if a stain isn’t coming out?
Stop applying more product and escalate to a professional. Persistent marks, particularly where the clear coat shows etching, require machine polishing rather than cleaning products.
Is it true that waxing after stain removal matters?
Absolutely. Waxing creates a protective barrier that prevents new contaminants from bonding directly to the paint. You should always wax after any stain removal treatment on exterior panels.