

TL;DR:
- Proper preparation and the right tools are essential for effective vehicle polishing.
- Machine polishing in small sections with light pressure prevents damage and produces better results.
- Regular polishing enhances vehicle appearance, protection, and value, especially under Sunshine Coast conditions.
Minor scratches, dull paint, and swirl marks are frustrating — especially when your car looked brilliant just months ago. Sunshine Coast conditions are tough on paintwork: intense UV, salt air, and road grime all accelerate paint fading. The good news is that restoring a showroom shine is within reach for any vehicle owner willing to follow a proper method. This guide walks you through every stage of machine polishing, from gathering the right tools to protecting your freshly restored finish. Whether you have an afternoon free or just a few hours, the steps here are practical, proven, and built for real results.
Table of Contents
- What you need to start vehicle polishing
- Preparing your vehicle for polishing
- Step-by-step guide to machine polishing
- Inspecting results and post-polishing steps
- Common mistakes to avoid and expert tips
- A professional perspective: Why vehicle polishing is worth mastering
- Take your shine further with professional detailing
- Frequently asked questions
Key Takeaways
| Point | Details |
|---|---|
| Proper prep matters | Thorough washing and surface safety checks are crucial steps before polishing starts. |
| Use safe tools | A dual-action polisher and clean pads reduce risk for beginners and protect your paint. |
| Work small, check often | Polishing small sections at a time helps avoid overheating and reveals imperfections quickly. |
| Inspect and protect | After polishing, inspect under good light and finish with wax, sealant, or ceramic for best results. |
| Avoid common mistakes | Light pressure, clean tools and patience make all the difference for a professional finish. |
What you need to start vehicle polishing
Now that you know what’s achievable, let’s gather what you’ll need. Starting with the right gear is what separates a polished finish from a scratched one. Skimping on equipment is where most beginners go wrong, so treat this list as non-negotiable.
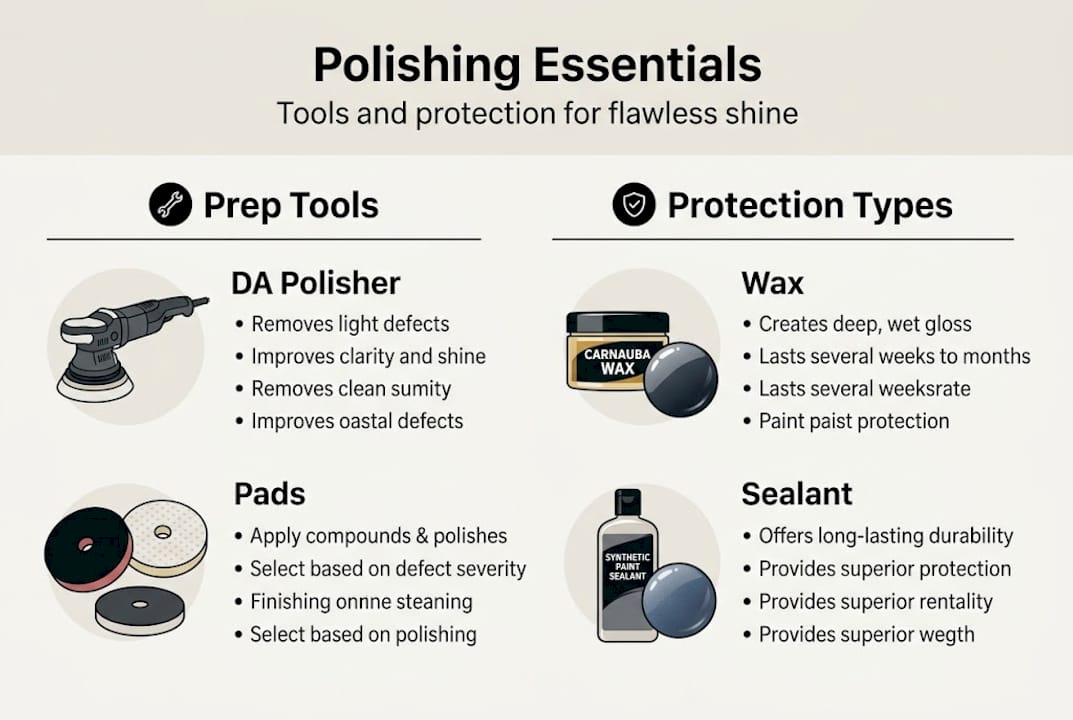
Essential tools and products:
- Dual-action (DA) polisher — the safest choice for beginners
- Polishing pads — at least two foam or microfibre pads suited to your polish grade
- Microfibre towels — at least six clean, dry ones
- Quality machine polish — matched to your paint correction needs (light, medium, or heavy cut)
- Masking tape — to protect rubber trim and plastics
- Car wash shampoo and a wash mitt
- Clay bar kit — for removing embedded surface contaminants
- Gloves and eye protection — always wear these when working with chemical products
Optional but valuable:
- Paint thickness gauge — critical for older or previously resprayed vehicles
- Panel inspection light — reveals swirls and holograms invisible in normal light
A detailing workflow basics approach helps you organise these items before you start so nothing gets missed mid-job.
| Tool | Purpose | Beginner priority |
|---|---|---|
| DA polisher | Safe machine correction | High |
| Polishing pads | Apply and work polish | High |
| Microfibre towels | Residue removal | High |
| Paint thickness gauge | Avoid cutting too deep | Optional |
| Panel inspection light | Spot hidden defects | Optional |
Using a DA polisher reduces risk for beginners compared to rotary polishers, which spin in one direction and can burn paint quickly if held still. The DA moves in an elliptical orbit, making it far more forgiving.
For extra detailing tips for a flawless finish, understanding how each tool contributes to the process helps you make smart decisions on the day.
Pro Tip: Always test your polish and pad combination on a small, hidden area first — such as inside a door jamb — before moving to a prominent panel. This confirms the product is compatible with your paint.
Preparing your vehicle for polishing
With everything on hand, proper preparation is the next essential step for a smooth finish. Rushing this stage is one of the most common reasons DIY polish jobs go wrong. Grit trapped under a polishing pad becomes an abrasive, not a helper.
Follow these steps in order:
- Wash thoroughly — use a two-bucket method to prevent cross-contamination. Rinse the vehicle completely to remove loose dirt, bird droppings, and road grime.
- Dry completely — use a clean microfibre drying towel. Water left on the surface dilutes your polish and reduces its cutting ability.
- Inspect the surface — run your fingers across the paint. Rough or gritty patches mean contaminants are still embedded.
- Clay the paint — glide a clay bar across lubricated paint to pull out tar, sap, and industrial fallout that washing can’t remove. This step makes the surface glass-smooth.
- Mask sensitive areas — apply masking tape along rubber seals, unpainted plastic trim, and badges. Polish stains are difficult to remove from porous surfaces.
- Check the environment — work in the shade. Direct sunlight heats the paint surface and causes polish to dry too fast.
A solid understanding of vehicle exterior detailing steps will help you move through this stage with confidence. Following an eco-friendly cleaning workflow also means you’re not washing contaminants into local waterways.
Important: Test a small spot before full application, and be extra cautious near paint edges, which are often thinner and more vulnerable to cutting through.
Pro Tip: A cool, freshly washed panel in the shade is your ideal starting condition. If the bonnet feels warm to the touch, wait. Heat accelerates polish drying and makes removal harder.
Step-by-step guide to machine polishing
Now that your car is properly prepared, here’s the exact process for a showroom-worthy result. Machine polishing feels intimidating the first time, but broken into small sections it becomes straightforward and satisfying.
- Prime your pad — dab four to five pea-sized drops of polish directly onto the pad. Spread it across the pad surface by hand or run the machine briefly before pressing it to the paint.
- Set speed to low — press the pad flat onto your first section and spread the polish at speed setting 2 or 3, without turning on the full power yet. This prevents product flinging.
- Increase to medium speed — once the polish is spread, increase to speed 4 or 5. Move the polisher in slow, overlapping passes.
- Work one section at a time — limit each working area to roughly 40 by 40 centimetres, about the size of an A3 sheet of paper. Smaller sections give you more control and better results.
- Use light, consistent pressure — let the machine do the work. Pressing hard does not improve results and risks paint damage.
- Wipe and inspect — after three to four passes, wipe the residue with a clean microfibre towel and check the result at an angle to the light.
- Repeat if needed — move to the next section only when you’re satisfied with the current one.
“DA polishers are less likely to leave holograms — ideal for non-professionals who want correction without added risk.”
Working in small sections minimises paint burn risk and delivers more even correction across the whole vehicle.
Once you’ve completed all panels, refer to resources on detailing for long-lasting shine and paint protection strategies to lock in what you’ve achieved.
Inspecting results and post-polishing steps
Your machine polishing is done — now, ensure the results are perfect and protected. This stage is where careful inspection separates a good job from a great one.
How to check your work:
- Move the vehicle into direct sunlight or use a panel inspection light at a low angle to the surface.
- Look for swirl marks, holograms (rainbow-like patterns), or dull patches you may have missed.
- If swirls remain, repeat with careful pressure or reduce machine speed to minimise micro-marring.
- For persistent holograms, swap to a finishing pad and a lighter polish grade.
Choosing your paint protection after polishing:
| Protection type | Durability | Application difficulty | Best for |
|---|---|---|---|
| Carnauba wax | 1 to 3 months | Easy | Budget-conscious owners |
| Paint sealant | 6 to 12 months | Moderate | Seasonal protection |
| Ceramic coating | 2 to 5 years | Advanced | Long-term investment |
For those wanting the most durable result, explore the ceramic coating application steps to understand what’s involved before committing.
Post-polish checklist:
- Wipe all surfaces with a clean microfibre towel to remove any remaining residue.
- Apply your chosen protection product while the paint is clean and uncontaminated.
- Wash and dry your pads before storing them to prevent compound hardening.
- Remove all masking tape carefully to avoid leaving adhesive marks.
Quick troubleshooting:
- Streaks — insufficient residue removal. Re-wipe with a fresh microfibre towel.
- Haze — polish dried on the surface. Lightly re-polish with a finishing pad.
- Unpolished patches — uneven pad pressure. Re-work the area with slow, overlapping passes.
Common mistakes to avoid and expert tips
Even with the best how-to, a few key mistakes can compromise results — let’s highlight what to watch out for. Most beginner errors come down to impatience and incorrect technique rather than wrong products.
Top mistakes and how to avoid them:
- Pressing too hard — excessive pressure damages paint and causes burning. Light, consistent contact is all you need.
- Dirty pads — a clogged pad scratches instead of polishing. Clean or swap pads every two to three panels.
- Skipping the test spot — jumping straight into a visible panel without testing can produce unexpected results on sensitive or previously resprayed paint.
- Rushing the job — moving too fast across sections means the polish doesn’t have time to break down properly. Slow, deliberate passes outperform frantic coverage every time.
- Ignoring edges — raised profiles, panel edges, and body lines have thinner paint. Most visible damage occurs on these high-contact areas. Reduce speed and pressure significantly near any edge.
For guidance on eco-conscious product choices, our eco-friendly cleaning tips offer practical alternatives that are kind to the Sunshine Coast environment.
Pro Tip: If your vehicle is more than five years old or has had panel repairs, use a paint thickness gauge before you start. Thin or previously corrected paint has limited material left, and knowing this upfront helps you choose the right cut level.
Stat to keep in mind: The majority of paint damage from DIY polishing happens on edges, curves, and raised body lines — not on flat panels. These are the areas where your technique matters most.
A professional perspective: Why vehicle polishing is worth mastering
Beyond the technical steps, here’s why mastering vehicle polishing genuinely matters for Sunshine Coast owners. We’ve detailed hundreds of vehicles across the region, and the pattern is consistent. The cars that look best year-round belong to owners who understand that polishing is an investment, not just a chore.
A well-executed machine polish doesn’t just restore clarity to the paint. It increases resale value, signals genuine care to buyers, and gives you genuine pleasure every time you walk toward your car. That pride is real, and it’s worth working for.
What we notice most often is that rushed, half-done attempts cause more damage than doing nothing at all. A hasty hand-wax applied to contaminated paint locks in scratches. A machine polisher held too long on an edge cuts through the clear coat. Patience and the right information make the difference between a car that shines and one that needs a respray.
Well-executed machine polishing also lasts far longer than a quick hand-wax. Months of protection versus weeks. For busy owners, that matters. Invest a proper afternoon once, do it right, and your car rewards you with months of genuine gloss. If you’re passionate about the process, exploring detailing for car enthusiasts will give you even more to work with.
Take your shine further with professional detailing
Ready to take your results to the next level? Here’s how you can save even more time and ensure a perfect finish.
If you’d prefer to skip the setup and get consistently professional results without lifting a finger, Isaac’s Pro Detailing Sunshine Coast brings expert care directly to your driveway, workplace, or favourite beach car park. Understanding the mobile car detailing workflow shows just how seamless the process can be.
Our team uses professional-grade products and techniques matched to local conditions, delivering pro-level detailing results that are difficult to replicate at home without the right experience. From cut and polish packages to ceramic coatings, every service is tailored to your vehicle. If you’re ready to hand it over to the experts, book a professional detail and see the difference a trained eye and professional equipment can make.
Frequently asked questions
How often should I polish my vehicle for best results?
For most Sunshine Coast vehicles, polishing every 6 to 12 months balances shine and paint health. Polishing too frequently wears down paint thickness, especially near edges, so restraint matters.
Is machine polishing safe for new cars?
Yes, with a dual-action polisher and careful technique it’s safe on new paintwork. DA polishers suit beginners and carry far less risk than rotary machines, provided you use light pressure and stay mindful of panel edges.
What’s the easiest way to avoid swirl marks after polishing?
Use clean pads, work one small section at a time, and finish with gentle passes using a quality microfibre towel. Working in small sections with clean pads is the single biggest prevention measure against swirls.
Can I polish by hand instead of using a machine?
Hand polishing works for very minor defects and surface-level dullness, but it won’t achieve the same depth of gloss or correction level as a machine polisher. For anything beyond light hazing, a DA polisher delivers far superior results with less effort.