
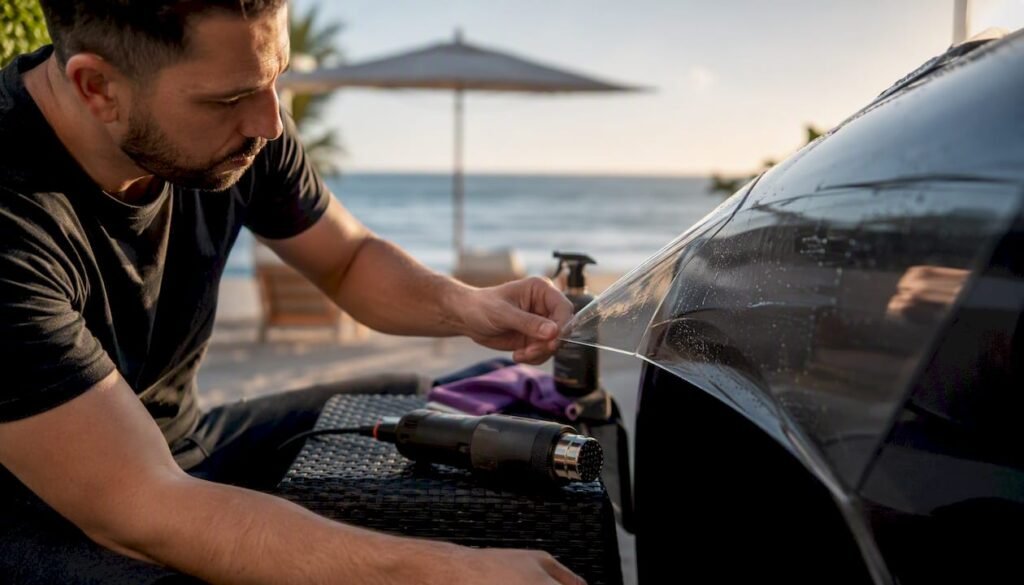
PPF removal is the controlled process of heating paint protection film, lifting its edges, peeling it away from the vehicle’s surface, and cleaning off any remaining adhesive. Done correctly, it will not damage factory paint. The risk comes from shortcuts: too much heat, the wrong scraper, or yanking film that has been baking under Australian sun for a decade.
Brands like XPEL, 3M Scotchgard, and SunTek engineer their films for clean removal within their rated lifespan, but Australian UV conditions tend to shorten that window. A film that would last ten years in a temperate climate may start showing stress at six or seven years on the Sunshine Coast.
For a typical mid-size sedan, professional PPF removal in Australia runs roughly $500–$1,500, with labour the biggest cost driver. Adhesive residue and any paint correction needed afterwards push the price higher. A straightforward removal on a newer film can take two to four hours; heavily degraded film on a full car can stretch to a full day or more.
- PPF removal is safe on factory paint when heat is controlled and the right solvents are used
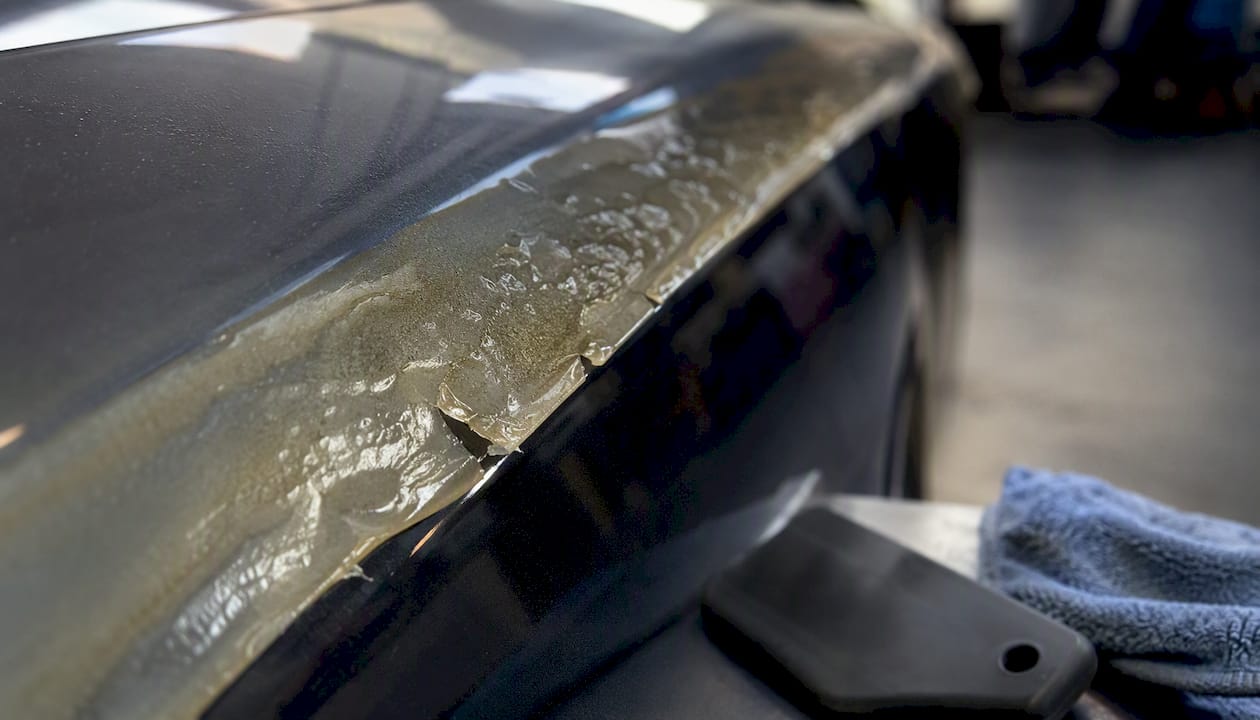
- Yellowing, cracking, edge lifting, or bubbling are signs to act now
- DIY is reasonable for newer film; film older than seven years or on repainted panels warrants a professional
- Isaac’s Pro Detailing handles mobile PPF removal across the Sunshine Coast
Key takeaways
PPF removal is safe on factory paint when heat is controlled, the right tools are used, and adhesive residue is treated with appropriate solvents before any polishing begins.
| Point | Details |
|---|---|
| Safe removal definition | Controlled heat, slow peel at 15–30°, and solvent clean will not damage factory clear coat. |
| Signs to act now | Yellowing, cracking, bubbling, edge lifting, or adhesive bleed mean the film should come off promptly. |
| DIY vs professional | DIY suits film under 7 years on factory paint; older film, repainted panels, or shatter-zone behaviour requires a professional. |
| Australian cost range | Professional removal for a mid-size sedan typically runs $500–$1,500, with labour the largest variable. |
| Aftercare first step | Inspect paint thickness and condition immediately after removal before applying any new protection. |
| Isaac’s Pro Detailing | Mobile PPF removal across the Sunshine Coast with on-site equipment, transparent pricing, and optional paint correction. |
Table of Contents
- What actually happens during PPF removal
- When should you remove PPF?
- How to remove PPF safely, panel by panel
- Tools and products you will need
- How PPF removal can damage paint — and the mistakes to avoid
- What professional PPF removal looks like in Australia
- Aftercare: protecting your paint once the film is off
- How Isaac’s Pro Detailing handles PPF removal on the Sunshine Coast
- The case for acting early — a perspective from Isaac’s Pro Detailing
- Mobile PPF removal on the Sunshine Coast with Isaac’s Pro Detailing
- Sources
What actually happens during PPF removal
Paint protection film is a transparent thermoplastic polyurethane (TPU) layer bonded to your car’s clear coat with a pressure-sensitive adhesive. Removal works by warming that adhesive to its release temperature, at which point it loses enough tack to let the film peel away cleanly rather than tearing or pulling the clear coat with it.
The sequence runs like this:
- Assessment: Check the film’s condition, note any lifted edges, bubbling, or discolouration, and confirm whether the paint underneath is factory or repainted.
- Controlled heat application: A regulated heat gun or steamer warms the panel to roughly 40–60°C. Polymer adhesive research confirms that controlled heating modifies adhesive release characteristics, which is why temperature monitoring matters more than guesswork.
- Edge lift and slow peel: A plastic scraper or fingernail lifts a corner, then the film is peeled back at a low angle (roughly 15–30°) at a slow, steady pace.
- Adhesive treatment: Any remaining adhesive is softened with a purpose-made solvent or steam and wiped away with a microfibre cloth.
- Final inspection and light polish: The clear coat is checked for marring, oxidation, or adhesive haze, then polished if needed.
Pro Tip: Peel parallel to the surface, not upward at a sharp angle. Lifting at 15–30° keeps tension on the adhesive bond rather than the clear coat beneath it.
When should you remove PPF?
Film does not last forever, and waiting too long makes removal harder and more expensive. Australian detailers note that high UV, salt air, and heat cycles accelerate film ageing well beyond manufacturer lab ratings, particularly in coastal and inland heat zones like the Sunshine Coast.
Visual and tactile signs that removal is overdue:
- Yellowing or amber tinting across panels
- Cracking, crazing, or a crazed surface texture
- Edge lifting or peeling corners
- Bubbling under the film surface
- Adhesive bleed visible at panel edges
- A “shatter zone” where the film tears into small fragments rather than peeling in strips — a strong signal to call a professional rather than attempt DIY
Most premium films carry a manufacturer rating of five to ten years. In high-UV Australian conditions, plan for the lower end of that range. A film installed in 2018 on a car parked outdoors on the Sunshine Coast is worth inspecting now.
Quick owner inspection checklist:
- Run a fingernail along an edge seam — does it lift easily or feel fused?
- Hold a torch at a low angle across the panel — any haze, bubbling, or texture change?
- Check the film surface for micro-cracks or a dull, chalky appearance
- Look at panel edges for adhesive bleed or brown discolouration
Environmental note: Removed PPF is a TPU plastic waste. In Australia, it cannot go into standard recycling bins. Check your local council’s hard waste collection schedule or drop it at a designated plastic waste facility.
| Condition | Action |
|---|---|
| Film under 5 years, no visible damage | Monitor; removal optional |
| Yellowing, minor lifting | Plan removal soon |
| Cracking, bubbling, adhesive bleed | Remove promptly |
| Shatter zone, heavy residue | Professional removal only |
How to remove PPF safely, panel by panel
This method suits relatively new film (under seven years) on factory-painted panels. If the film shatters on first contact or the paint is repainted, stop and call a professional.
- Wash and dry the panel thoroughly. Contaminants under a scraper cause scratches before you even start.
- Confirm paint type. Factory clear coat handles heat better than respray. If you are unsure, get a paint-thickness reading first. Repainted panels and aged film carry a meaningfully higher risk of clear-coat lift.
- Warm the panel. Use a regulated heat gun or steamer. Keep the nozzle moving; do not dwell in one spot. Target surface temperature: 40–60°C. Use an infrared thermometer to verify — never rely on feel alone.
- Lift an edge. At a seam or corner, use a plastic scraper or your fingernail to lift a small tab. Never use a metal blade.
- Peel slowly at a low angle. Hold the film at roughly 15–30° to the panel surface and pull at a slow, steady pace. Reapply heat every 15–20 cm as you go.
- Manage tears. If the film tears, re-warm the area, lift a new edge, and continue. Do not force a torn section.
- Treat adhesive residue. Apply an automotive adhesive remover (petroleum-based or citrus-based) to remaining adhesive, allow a short dwell time, then wipe with a clean microfibre cloth. Repeat as needed.
- Inspect and polish lightly. Check for marring or haze. A light machine polish removes most surface marks. For deeper correction, see the cut and polish process.
Safety warnings:
- Never exceed 60°C on the panel surface — factory clear coats can soften above this range
- No open flames, ever
- Work in a ventilated space when using solvent-based adhesive removers
- Wear nitrile gloves when handling solvents
Pro Tip: If the film starts to fragment into small pieces rather than peeling in strips, that is the shatter zone. Stop immediately. Continuing will multiply your labour time and risk paint damage. This is a professional job.
Decision points — stop and call a pro if:
- Film is older than seven years
- Film shatters or crumbles on contact
- Paint is repainted or has a non-standard clear coat
- Adhesive is crystallised or heavily bonded
- Any paint lifting appears during removal
Tools and products you will need
Getting the tools right matters as much as technique. The wrong scraper or solvent is the most common cause of avoidable paint damage.
Essential tools:
- Heat source: A regulated heat gun with adjustable temperature settings, or a steam cleaner. A steam cleaner is gentler and harder to overheat with. Australian detailers list steamers as the preferred tool for older or more fragile film.
- Infrared thermometer: Non-negotiable for keeping panels in the safe temperature window. Available from most hardware stores in Australia.
- Plastic scrapers or plastic razor blades: Stiff enough to lift edges without flexing into the paint. Never substitute a metal blade.
- Microfibre towels: Multiple clean cloths for solvent application and wipe-down.
- Adhesive remover: Choose a product labelled safe for automotive clear coats. Citrus-based options (such as Goo Gone Automotive) are gentler; petroleum-based removers work faster on heavy residue. Both are available at Supercheap Auto and Repco across Australia.
Optional or professional-grade tools:
- Eraser wheel: Fits a drill and spins away adhesive residue quickly. Effective but aggressive — use only on factory paint and keep the drill speed low. Not recommended for first-time DIYers.
- Professional adhesive solvents: Detailers often use stronger solvent blends not available at retail. These require proper ventilation and PPE.
- Tensioning tools and specialised PPF scrapers: Used by installers to maintain consistent peel angle across large panels like bonnets and roofs.
Pro Tip: For a one-off removal, rent a steam cleaner rather than buying a heat gun. Steam is harder to overheat with, and rental costs from Kennards Hire or similar Australian hire companies typically run $50–$80 per day, which is far less than a heat gun capable of the same control.
How PPF removal can damage paint — and the mistakes to avoid
Most paint damage during PPF removal is preventable. Understanding the failure modes is half the battle.
The main failure modes:
- Clear-coat lift: The adhesive bond to the clear coat is stronger than the clear coat’s bond to the base coat — most common on repainted panels or film that has been left far beyond its rated life.
- Micro-marring from scraping: Metal tools, grit trapped under a scraper, or aggressive wiping with a dry cloth all leave fine scratches in the clear coat.
- Heat damage: Prolonged dwell with a heat gun above 60°C softens the clear coat, causing it to wrinkle, cloud, or lose gloss permanently.
- Adhesive chemical bonding: On aged film, the adhesive can partially cure into the clear coat surface, making it resistant to standard solvents and requiring professional-grade treatment.
Common DIY mistakes:
- Pulling the film upward at a steep angle instead of parallel to the panel
- Using a metal scraper, knife, or fingernail with excessive force
- Applying the wrong solvent (acetone, WD-40, or harsh degreasers can strip clear coat or leave residue)
- Overheating one spot by holding the heat gun still
- Ignoring repainted panels or thin clear coats
Red flags — call a professional immediately if:
- Any paint or clear coat lifts with the film
- The film shatters into fragments on contact
- Heavy crystallised adhesive does not respond to solvent after two applications
- You notice bare metal or primer exposed anywhere
Pro Tip: Test your adhesive remover on a hidden spot first — inside a door jamb or under a bonnet edge. If the clear coat hazes or softens within 30 seconds, switch products before touching a visible panel.
What professional PPF removal looks like in Australia
A professional technician approaches removal differently from a DIYer in one key respect: measurement. Professionals use infrared thermometers to keep panels in a precise temperature window rather than relying on subjective feel, which reduces the risk of overheating and clear-coat damage across a full vehicle.
Typical professional workflow:
- Paint-thickness gauge reading on each panel before starting (baseline for comparison after removal)
- Controlled heating with infrared monitoring, panel by panel
- Systematic edge-lift using specialised plastic tools and consistent peel angle
- Solvent dwell and steam or chemical clean for residue
- Post-removal paint inspection and light correction if required
Australian cost and timeline expectations:
Professional removal for a mid-size sedan typically falls in the $500–$1,500 range. What moves the price:
- Film age and condition: Degraded or shattered film requires more labour
- Adhesive residue severity: Heavy residue adds solvent and time costs
- Paint correction required: If the paint needs polishing after removal, that is usually quoted separately
- Vehicle size: SUVs and utes cost more than hatchbacks
Timeline: a straightforward removal on a newer film typically takes two to four hours for a sedan. Heavily aged film on a full-size SUV can take a full day.
What to expect from a reputable service:
- Pre-removal paint-thickness report
- Before-and-after photos
- Clear pricing with no hidden extras
- A defined scope for what happens if paint correction is needed
Pro Tip: Ask the detailer which film brand was installed before quoting. The adhesive system used — not just the film’s age — is one of the biggest predictors of removal difficulty. A shop that asks this question before quoting is one that knows what they are doing.
Aftercare: protecting your paint once the film is off
The panel underneath PPF has been sealed from the environment for years. What you find varies: some cars come out with near-perfect paint; others show oxidation, micro-scratches, or adhesive haze that needs attention before any new protection goes on.
Immediate inspection steps:
- Check clear-coat thickness with a paint gauge — compare to the pre-removal reading if you have one.
- Look for chips, sanding marks, or oxidation under strong lighting.
- Run a clean microfibre across the surface to feel for texture irregularities.
- Note any areas where adhesive haze remains after the initial clean.
Cleaning and correction protocol:
- Remove any remaining adhesive haze with a light automotive polish by hand or machine.
- For deeper scratches or oxidation, a machine cut and polish is the right tool. Hand polishing alone will not cut through moderate oxidation.
- Avoid abrasive compounds on thin clear coats — use a light finishing polish first and assess.
Protection options after removal:
- Reapply PPF: Best for high-impact areas (bonnet, mirrors, bumper). Provides the strongest physical protection in Australia’s stone-chip-heavy conditions.
- Ceramic coating: Excellent chemical resistance and UV protection; pairs well with Sunshine Coast’s paint protection needs. Does not protect against physical chips the way PPF does.
- Paint sealant: Lower cost, easier to apply, but shorter lifespan. A reasonable bridge option if you are deciding between PPF and ceramic.
First-wash and maintenance schedule:
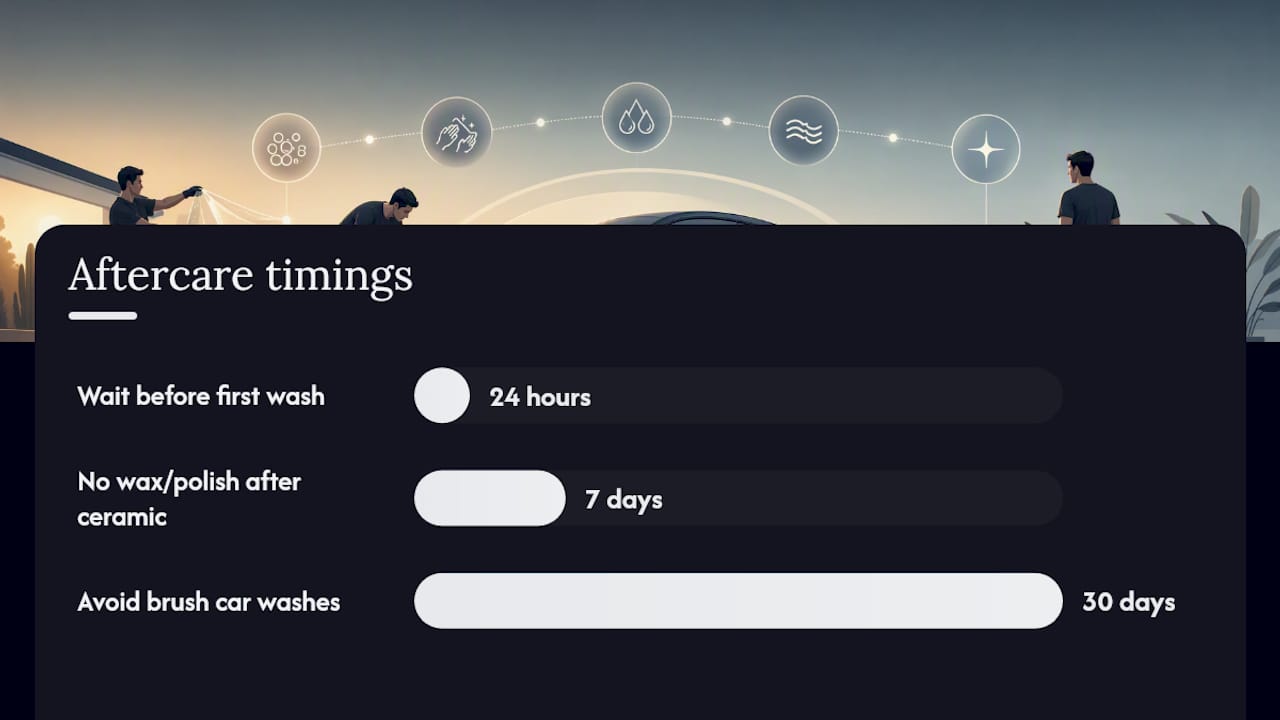
- Wait at least 24 hours after removal before washing, longer if a sealant or coating was applied.
- Avoid automatic car washes with brushes for the first 30 days.
- Use a pH-neutral shampoo for the first wash.
- No wax or polish for 7 days if a ceramic coating was applied.
How Isaac’s Pro Detailing handles PPF removal on the Sunshine Coast
Isaac’s Pro Detailing operates as a fully mobile service across the Sunshine Coast, which means the removal happens at your home, workplace, or wherever the car is parked. No drop-off, no waiting room.
The on-site workflow:
- Mobile assessment on arrival: panel condition, film age, adhesive state, and a paint-thickness reading before any work starts
- Controlled removal using regulated heat sources and infrared monitoring
- Adhesive treatment with automotive-grade solvents and steam cleaning
- Finishing polish and protection application if required
- Before-and-after photo documentation
What customers should expect logistically:
- A flat, accessible parking space (driveway or car park works well)
- Access to a standard 240V power outlet for equipment
- Two to five hours on-site depending on vehicle size and film condition
- Transparent pricing before work begins — no surprise extras
Isaac’s uses eco-friendly product choices where available, including citrus-based adhesive removers and biodegradable wash products, consistent with the Sunshine Coast’s environmental values.
Pro Tip: Book a mobile assessment before committing to removal. A quick inspection tells you whether the film is still in DIY territory or whether it has crossed into professional-only work. It also gives you a baseline paint-thickness reading you can use to verify the job was done without damage.
The case for acting early — a perspective from Isaac’s Pro Detailing
The most common mistake Sunshine Coast car owners make with PPF is treating it as a set-and-forget product. It is not. Film ages, adhesive chemistry changes, and Australian UV accelerates both processes faster than most owners expect.
The honest answer on DIY versus professional removal: if the film is under five or six years old, in reasonable condition, and on factory paint, a careful DIYer with the right tools can handle it. The moment any of those conditions change, the risk-reward calculation shifts sharply toward professional removal. A botched DIY job on a repainted panel can cost more in paint correction than the removal itself would have.
What we recommend at Isaac’s Pro Detailing is a simple inspection first. Most owners do not know whether their paint is factory or repainted, and that single fact changes the entire approach. Get that confirmed before touching the film.
Mobile PPF removal on the Sunshine Coast with Isaac’s Pro Detailing
Removing old or degraded PPF is one of the more technically demanding jobs in automotive care, and getting it wrong on a repainted panel or aged film can mean expensive paint correction. Isaac’s Pro Detailing brings professional-grade equipment directly to you across the Sunshine Coast, handling the full removal process on-site: controlled heat removal, adhesive treatment, light paint correction, and optional reapplication of PPF or a ceramic coating to protect the freshly exposed paint.
Pricing is quoted transparently before work begins, based on vehicle size, film condition, and whether paint correction is needed. No hidden extras. The mobile detailing workflow means you do not need to drop the car off anywhere. Check the service menu for current pricing and availability, or get in touch directly for a quote on your specific vehicle and film condition.
Sources
The following sources informed this article and are worth reading for deeper technical detail or local pricing context:
- Paint protection film — Wikipedia
- PPF removal cost: what you’ll actually pay in 2026 — FlexiPPF
- Does PPF damage paint when removed? — TeckWrap International
- Applied polymers and adhesive behaviour — MDPI article