
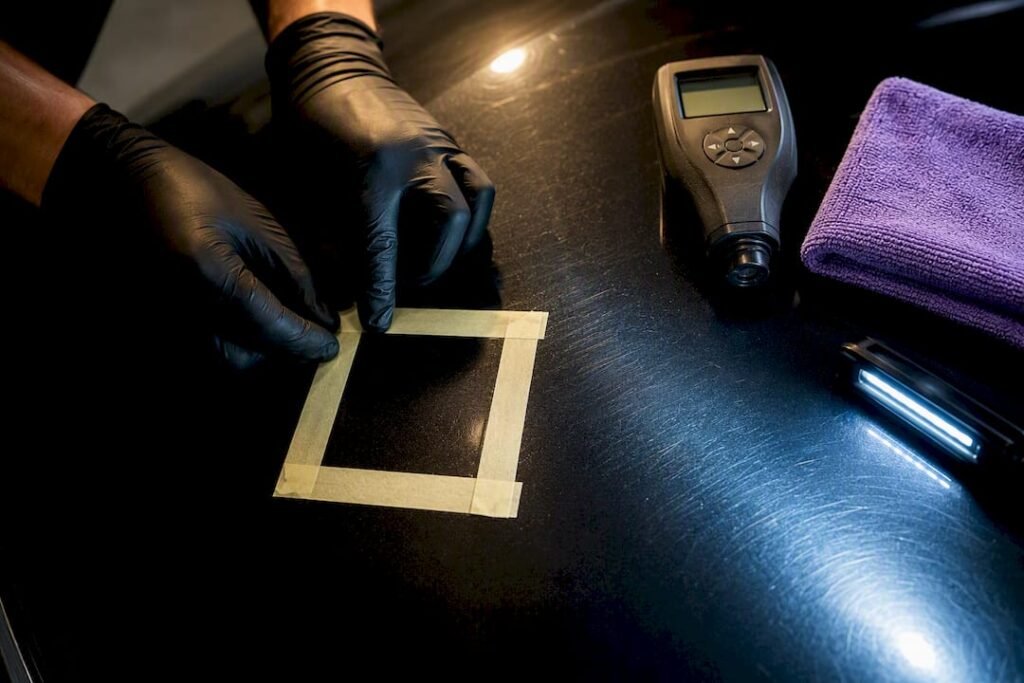
Single-stage polish is the right call for light-to-moderate swirls, oxidation haze, and dull clear coat that just needs enhancement, not correction. It’s the wrong tool for deep scratches, heavy oxidation, or paint that’s already thin. Expect a genuine, visible lift in gloss and clarity, not a show-car respray. Before you touch a machine to the paint, inspect it under strong light and run a test patch.
TL;DR:
- Single-stage polish is suitable only for light surface defects and dullness, not deep scratches or heavily oxidized paint, and requires careful inspection and testing beforehand.
- Using a paint thickness gauge and running a small test patch on hidden areas ensures safe correction and prevents thinning or damaging the paint layer.
- Proper preparation, including washing, decontamination, masking, and alcohol wipe-down, is essential to avoid creating new scratches or uneven results during polishing.
- A dual-action polisher with appropriate, lightly worn pads is recommended to minimize heat and reduce the risk of paint damage, especially on single-stage finishes.
- Professional polishing services incorporate thorough surface checks and testing, making them a safer choice if the paint is already thin or if precise correction is required before applying coatings.
Table of Contents
- What is single-stage polish, really?
- How do you inspect paint and run a safe test patch?
- What prep work does the paint need before polishing?
- What tools and products work best for single-stage polishing?
- How do you actually perform a single-stage polish?
- What are the risks and when should you stop?
- How do you protect the finish after polishing?
- What does a professional single-stage job actually involve?
- The gap between DIY confidence and DIY caution
- Want a pro to handle the test patch and the risk?
- Sources
- FAQ
What is single-stage polish, really?
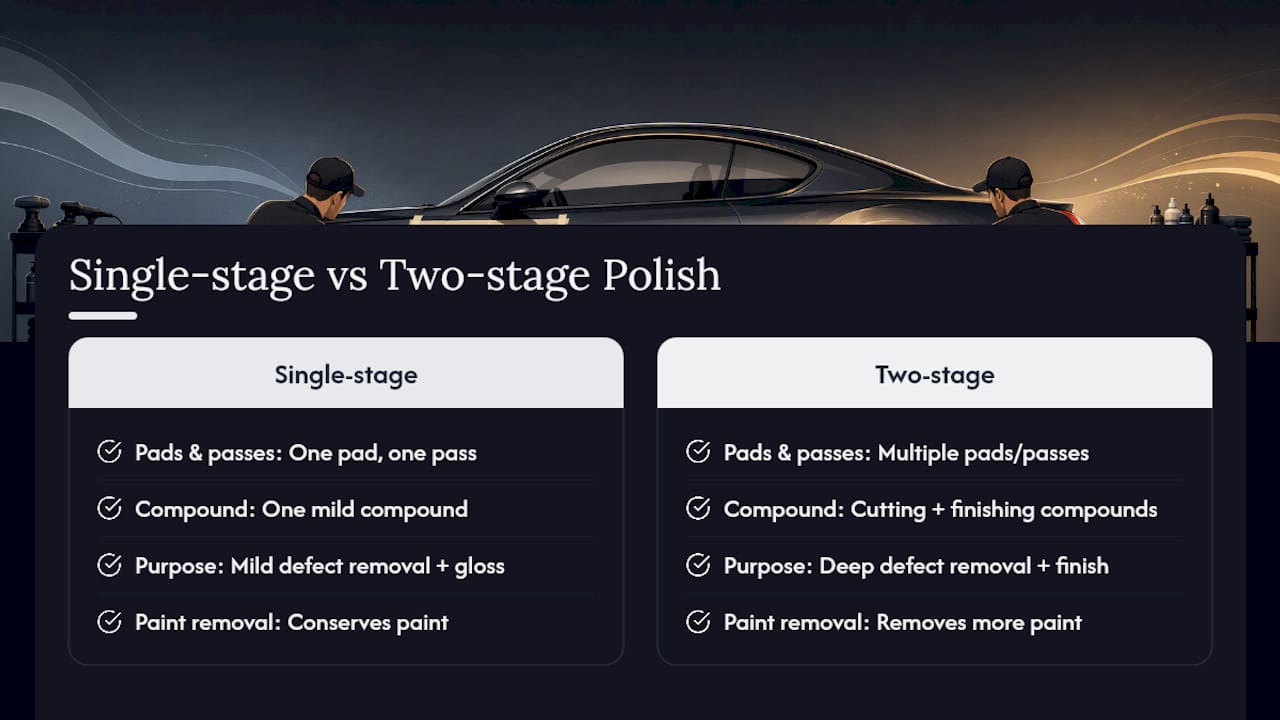
Single-stage polish means one pad, one compound, one pass. You’re combining mild defect removal with gloss enhancement in a single step, rather than splitting the job into a cutting stage and a refining stage.
That distinction matters more than most DIYers realise. Single-stage correction uses one pad and polish to address light defects and boost gloss, while two-stage separates the cut from the finish, using a more aggressive compound first to chase out deeper marks, then a finishing polish to remove the haze that cutting leaves behind. Two-stage exists because cutting compounds are inherently more aggressive. They remove more material to erase deeper defects, then need a second, gentler pass to bring back clarity.
A “stage” here just means a pass with a specific pad and compound combination. One-step uses a single pairing throughout; multi-stage changes pad and compound between passes to match the defect depth at each point in the process.
Single-stage conserves paint by design, which is exactly why it suits daily drivers with light swirling from car washes or careless towel work. It’s insufficient when scratches have real depth, when oxidation has chalked the colour coat, or when the finish has been heavily neglected for years. In those cases, one pass with a mild compound just won’t touch the damage, and you’ll be tempted to push harder and longer than the paint can safely take.
How do you inspect paint and run a safe test patch?
Bright, direct light reveals what ambient daylight hides. A cross-lighting rig or an LED inspection wand, held at a low angle and viewed from several directions, will show up swirl marks, holograms, and buffer trails that look invisible under a workshop’s overhead fluorescents.
Where you can, take a paint thickness reading before you start. Readings well below the panel average, or unusually low compared to nearby panels, suggest previous repaints, filler work, or a history of hard correction, and that’s your cue to go gentler than planned or stop altogether.
Then run a test patch. Pick a low-visibility spot, such as inside the fuel door or a lower rear quarter, and work a small 2 by 2 foot section with the least aggressive pad and compound combination you think will work.
- Check for actual defect removal, not just added gloss from oils in the polish.
- Wipe the section down and inspect again once it’s fully dry.
- Watch for pigment transfer onto your pad, which is a warning sign on single-stage paint specifically, since polishing single-stage finishes can remove part of the coloured layer itself rather than just the clear coat.
Pro Tip: Keep the pad you used for the test patch separate from your working pads. If you see colour transfer, you’ll know immediately which combination caused it instead of guessing later.
What prep work does the paint need before polishing?
Skipping prep is the single most common reason a single-stage job looks patchy or develops fresh scratches mid-polish. Contaminants left on the surface get dragged around by the pad, and that’s how you turn a polishing session into a scratching session.
- Wash with two buckets. One bucket for clean soapy water, one for rinsing your wash mitt, so you’re not reapplying grit to the paint with every pass.
- Treat with an iron remover. Embedded brake dust and rail dust sit in the clear coat (or the single-stage colour coat) and will show up as fine grit under the pad if left in place.
- Clay the panel. A clay bar or clay mitt lifts bonded contaminants that washing alone can’t shift, leaving a glass-smooth surface you can feel with a flat palm.
- Mask trim, badges, and edges. Rubber trim, decals, and sharp panel edges are where polish burns and pad-edge scuffs happen most often, so a few minutes of tape saves hours of touch-up.
- Wipe with isopropyl alcohol after polishing. This step comes after polishing, not before, but it belongs in the same prep mindset. It strips residual polish oils so your sealant actually bonds to paint instead of sitting on a film.
None of these steps are optional extras. A panel that hasn’t been decontaminated will fight you the entire time you’re polishing it, and no amount of product will fix marring caused by grit still sitting in the finish.
What tools and products work best for single-stage polishing?
A dual-action polisher is the right machine for almost every home garage and mobile setup. Random orbital and dual-action machines generate less heat and are more forgiving than rotary polishers, which matters enormously when you’re working alone on single-stage paint with no clear coat buffer to protect you from mistakes. Rotary machines cut faster and correct deeper, but they also burn through paint faster in inexperienced hands. Leave rotary work to professionals unless you’ve had real hands-on training.
Pad choice should follow the same logic as your test patch: start soft, escalate only if needed.
- Finishing foam pads suit light swirls and general dullness, and they’re the safest starting point for most single-stage jobs.
- Light-cut foam or microfibre pads step up the aggression slightly for moderate marring, but they also raise the risk of holograms if you’re not experienced with pad rotation and dwell time.
- Pad face condition matters as much as pad type. A worn, cupped pad face behaves differently to a flat one, so inspect and clean pads between panels rather than assuming a pad performs the same all day.
On product choice, named finishing polishes like Meguiar’s M205 are widely used for light marring and general gloss enhancement, while Meguiar’s M105 is more commonly reserved for cutting stages in two-stage work rather than a genuine single-stage job. Enthusiasts running dual-action machines also reach for Rupes Uno Pure as a light, one-step polish, and pros working with rotaries sometimes use Koch Chemie M3.01 as a heavier cutting compound, though that product sits closer to two-stage territory than true single-stage finishing. Machines such as the Rupes LHR21 dual-action polisher are a common choice for this kind of work because of their low-heat, forgiving output.
Pad and compound matching is the single most critical skill in machine polishing; pros consistently start with the least aggressive combination that could plausibly work, then step up only if a test patch proves it’s necessary. Keep your product quantity small, roughly a pea-sized amount per section, and let the machine’s speed do the work rather than adding more polish to compensate.
How do you actually perform a single-stage polish?
Once prep is done and your test patch has confirmed the right pad and compound, the process itself is repetitive but methodical.
- Set up your machine. Attach the backplate, centre the pad, and prime it with a small amount of polish spread across the face before it touches paint.
- Divide the panel into sections. Work in roughly 2 by 2 foot areas so you can control speed, pressure, and dwell time consistently across the whole car.
- Select a moderate speed setting. Most dual-action polishers run comfortably in the mid-range for single-stage finishing work; too slow won’t break down the polish, too fast throws product and generates unnecessary heat.
- Work overlapping passes. Move the machine slowly across the section in overlapping lines, then repeat at a perpendicular angle, using light to moderate pressure rather than leaning on the machine.
- Watch the polish break down. You’ll see it turn clear and thin as it works. That’s your cue that the compound has done its job on that section, not a sign to keep grinding away.
- Wipe off residue with a clean microfibre. Check the panel under your light before moving on, comparing it to the test patch result.
- Decide on a second pass. If defects remain and the paint thickness reading still gives you room, a second pass with the same combination is reasonable. If you’re not seeing improvement after two passes, escalating pad aggression on single-stage paint is a decision to make cautiously, not automatically.
- Move to the next section, overlapping slightly with the one you just finished to avoid leaving an uneven line between them.
For a typical sedan, budget somewhere in the range of a few hours for a full single-stage polish, in line with how single-stage correction on a daily driver generally runs a few hours versus 8 to 12 hours for a full two-stage job on more severely damaged paint. Larger vehicles, heavily oxidised paint, or a first-timer working carefully will push toward the upper end of that range.
Pro Tip: If a section isn’t improving after two passes with your chosen pad and compound, stop and reassess rather than switching to a more aggressive combination on the fly. That’s exactly the moment a test patch on a fresh, more aggressive pairing pays for itself.
Our step-by-step vehicle polishing guide breaks this workflow down further if you want more detail on section-by-section technique.
What are the risks and when should you stop?
Every pass of a polishing pad removes a small amount of material. On single-stage paint, that material can include the actual colour pigment, not just a protective clear layer sitting above it. Repeated aggressive polishing over the same area is how paint thins to the point of visible problems.
- Colour fade or a chalky, uneven look across a panel usually signals the pigment layer itself has been thinned unevenly.
- Burn marks or discolouration, often a slight yellowing or a scorched patch, point to too much heat building up under the pad in one spot.
- Holograms (fine circular scratch patterns visible under direct light) mean the pad or compound was more aggressive than the paint could handle cleanly.
If your thickness gauge readings are already low, or a test patch shows deep scratches that don’t budge with a light compound, that’s your signal to stop DIY work and bring in a professional. Heavier correction on thin paint is a genuine risk of going straight through to primer, and that’s not a mistake you can polish your way out of.
High-end coating prep is where this distinction matters most. If you’re planning a ceramic coating, the paint underneath usually needs multi-stage correction first, because two-stage work separates cutting and refining specifically to prepare heavier defects for the kind of clarity a coating locks in permanently. Coating over unresolved swirls just seals the damage under a hard, harder-to-remove layer. If your own inspection turns up defects a single-stage pass can’t clear, our cut and polish page explains what that heavier correction actually involves.
How do you protect the finish after polishing?
Polish oils sit on the surface right after you finish a panel, and they’ll interfere with anything you try to layer on top. Wipe the paint down with an isopropyl alcohol panel prep spray before applying any protection, so you’re bonding a sealant or wax to bare paint rather than residual oils.
A synthetic sealant gives the best short-term durability for a freshly polished single-stage finish, typically holding up for a few months of regular driving and washing. A quality carnauba or synthetic wax works too, and many enthusiasts prefer the warmer look it gives on single-stage colours, though it won’t last quite as long as a sealant.
If a ceramic coating is the end goal, hold off applying wax or sealant at all. Coatings need to bond directly to paint, and any product left behind, however light, can interfere with that bond. Confirm your finish is genuinely defect-free first. If your test patch or panel inspection showed remaining swirls, that correction needs finishing before coating goes on, not after. Our ceramic coating guide covers what that prep sequence looks like in practice.
Maintenance after that is simple: wash with pH-neutral shampoo, avoid automatic car washes with abrasive brushes, and top up your sealant or wax every few months to keep the gloss you just worked for.
What does a professional single-stage job actually involve?
A mobile detailer running single-stage jobs day in and day out follows a fairly consistent sequence: full decontamination wash, iron treatment, clay, then a paint thickness check on every panel before any pad touches the car. That thickness reading isn’t a formality. It’s the difference between a confident one-pass polish and a job that gets declined on the spot.
A typical single-stage job runs through prep, a test patch on a hidden panel, a single measured pass across each section, and a sealant applied once the paint’s confirmed clean and dry. On an average sedan, that whole process usually sits within a few hours, depending on how much correction the swirls actually need.
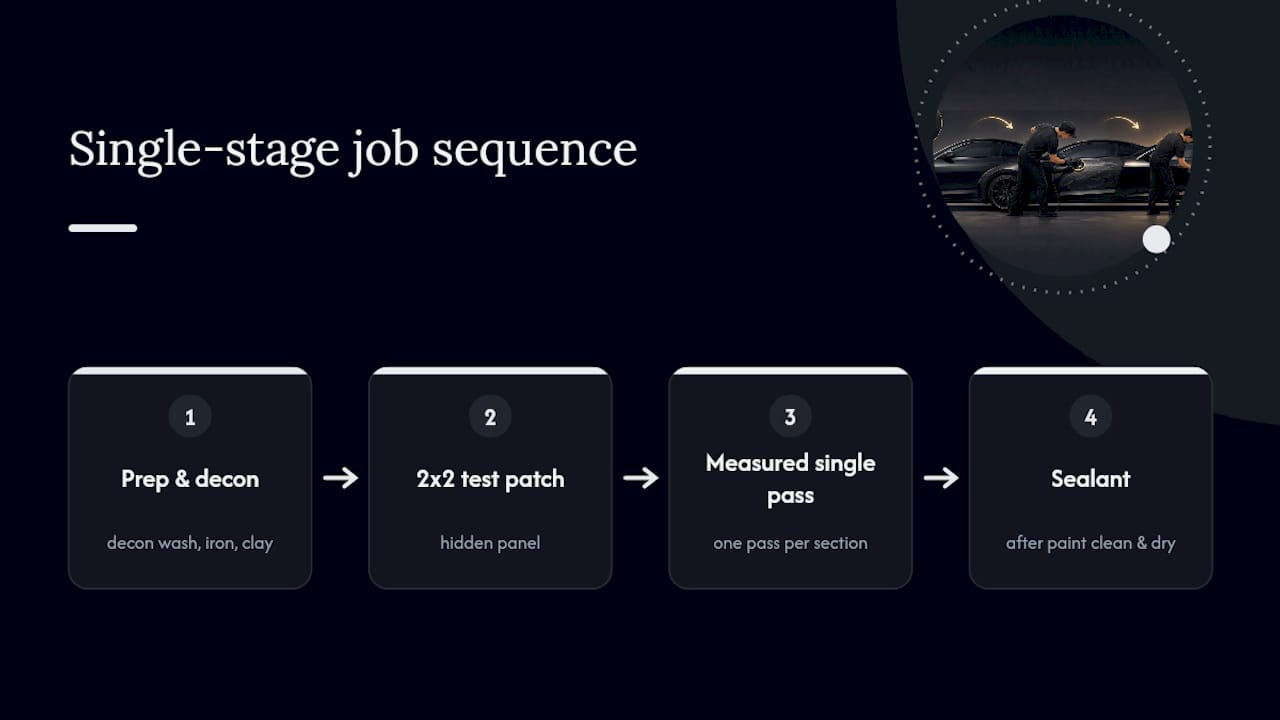
Where thickness readings come back low, or a test patch shows the paint isn’t responding to a light compound, the honest answer is to recommend two-stage correction instead, or decline the polish altogether rather than risk thinning the paint further. Our mobile detailing workflow walks through how that full sequence runs on-site.
The gap between DIY confidence and DIY caution
Most DIY guides sell single-stage polishing as easy because the products are gentle. That’s true right up until someone skips the test patch, assumes their paint is standard thickness, and finds out the hard way that a previous respray left barely anything to work with. The technique itself isn’t the risk. Overconfidence about what’s under the pad is.
The conventional advice gets one thing backwards: it treats single-stage as the “safe” choice because it’s less aggressive than two-stage work. Less aggressive doesn’t mean risk-free, particularly on single-stage paint where you’re polishing the actual colour, not a sacrificial clear layer above it. A thickness gauge and a five-minute test patch matter more on this job than on almost any other correction task in detailing.
If there’s one priority worth taking from all of this, it’s sequencing: inspect first, test second, polish third. Skip that order and even the gentlest polish and softest pad can’t save you from a decision made blind.
— isaac’s
Want a pro to handle the test patch and the risk?
Professional mobile detailers offer single-stage polish jobs on-site, bringing paint thickness gauges, cross-light inspections, and test-patch discipline that DIY guides can only describe. Every job starts with a proper read on your paint’s condition before a pad touches it, using eco-friendly products and pricing set according to vehicle size.

If your clear coat is already thin, your schedule doesn’t have a spare weekend, or you’d simply rather have someone measure before they cut, that’s exactly when professional help can be worth considering over a DIY attempt. You get the same one-pass, test-patch approach covered above, run by someone who does it daily rather than for the first time on your own driveway. Check the wash menu for single-stage polish pricing by vehicle size, or book a time that suits your location and get your paint measured before anything gets touched.
Sources
Single stage vs two stage paint systems, Single-stage vs two-stage paint correction, How to do paint correction, Machine polishing to achieve paint correction, and how to remove swirl marks.
- Single-stage vs two-stage paint correction (DetailerMade)
- Machine polishing to achieve paint correction (CarCareProducts)
FAQ
Can you polish single stage paint?
Yes, but with more caution than two-stage systems require, since machine polishing on single-stage finishes removes part of the colour layer itself rather than just a clear coat sitting above it. A paint thickness reading and a test patch before you start are the safest way to confirm there’s enough material to work with.
Is a single-stage polish worth it?
For light-to-moderate swirls and general dullness on a daily driver, yes. It restores meaningful gloss and clarity in a fraction of the time and material removal that a full two-stage correction needs.
What does a one-step polish do?
A one-step polish combines mild defect removal with gloss enhancement in a single pad-and-compound pass, rather than splitting the job into a separate cutting stage and refining stage.
What are the three stages of polishing?
Detailing more commonly refers to one-stage and two-stage correction, though some jobs use a three-step approach of cut, polish, and finish for heavier damage. Each stage uses a progressively less aggressive pad and compound to remove deeper defects first, then restore clarity.
When should I choose a professional over a DIY single-stage polish?
Bring in a pro when your paint thickness readings are already low, when scratches are visibly deep, or when you’re prepping for a ceramic coating and need a reliable, measured correction before the coating goes on.