
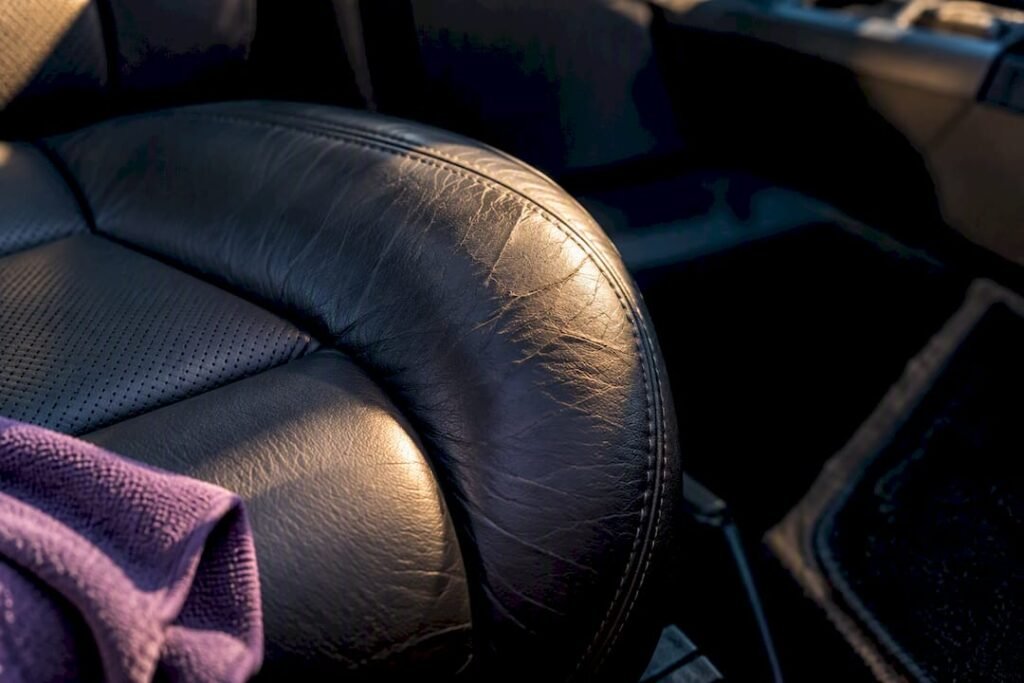
Routine gentle cleaning, protection matched to your leather’s age, and controlling heat and UV exposure will stop most cracking before it starts. Wipe seats down weekly, run a proper clean every 2 to 4 weeks, and check the driver’s bolster for early wear. A windscreen sunshade and a shaded park do more for long-term leather health than any bottle of conditioner ever will.
TL;DR:
- Regularly using a sunshade and parking in shaded areas significantly reduces UV exposure, the main cause of leather cracking.
- Cleaning with a pH-balanced, solvent-free cleaner and vacuuming grit weekly prevents surface abrasion that accelerates deterioration.
- Older leather (over three years) benefits from biannual conditioning with UV filters, while newer coated leather only needs a friction blocker or protectant.
- Targeted protection of high-wear areas like the driver’s bolster with frequent application of friction blockers slows early cracking.
- Small surface cracks can be DIY repaired with flexible filler and matching dye, but larger or structural damage requires professional restoration.
Table of Contents
- How do you prevent leather car seats from cracking?
- What’s the correct step-by-step cleaning routine?
- Should you condition or protect your leather seats?
- Why does sun exposure crack leather seats fastest?
- How do you stop the driver’s seat bolster from cracking?
- Can you fix small cracks in leather seats yourself?
- What does a professional detailer actually do differently?
- Do humidity and cold weather affect leather seats too?
- What’s the right way to dry leather seats after cleaning?
- What common mistakes make leather seats crack faster?
- What DIY repair kits work for minor leather damage?
- What actually separates good leather care from wasted effort
- How Com can help prevent or repair cracked leather seats
- Sources
- FAQ
How do you prevent leather car seats from cracking?
Cracking is rarely one single failure. It’s the slow compounding of three things: dried-out fibres, abraded surface coating, and grit acting like sandpaper every time you sit down. Get ahead of all three and the leather stays supple for years longer than the factory warranty ever promised.
Here’s the maintenance cadence that actually matters, broken down by how often each task needs doing.
- Weekly — dust and wipe with a dry or lightly damp microfibre cloth, then vacuum the seams with a soft brush attachment. This is the single cheapest habit you can build, because micro-grit trapped in stitching acts like fine sandpaper every time you slide in and out.
- Every 2 to 4 weeks — a proper clean with a pH-balanced, solvent-free leather cleaner. If you’re in Far North Queensland or anywhere the cabin regularly hits oven temperatures, lean toward the 2-week end of that range.
- Every 3 to 6 months — protect. New leather (under about three years old) gets a friction blocker or protective shield. Older leather gets a proper conditioner to restore lost oils, and in extreme heat that conditioning cycle can shorten to monthly.
A few things belong on your “do this immediately” list, not your calendar:
- Keep a sunshade in the car and use it every single time you park in open sun.
- Blot spills the moment they happen. Never let liquid sit and wick into the seams.
- Keep sharp objects (keys, tools, dog leads with metal clips) off the seats entirely.
- Never reach for petrol-based or silicone-heavy dressings. They sit on the surface and attract dirt while accelerating wear.
Pro Tip:Keep a small “leather kit” in the glovebox: one high-GSM microfibre, a small spray bottle of your pH-balanced cleaner, and a folded sunshade. If it takes less than 90 seconds to grab, you’ll actually use it.
What’s the correct step-by-step cleaning routine?
Most cracking damage isn’t caused by neglect. It’s caused by cleaning the wrong way, with the wrong product, at the wrong frequency. Get the sequence right and you remove the two biggest accelerants of dry, brittle leather: trapped grit and alkaline residue.
Tools worth having on hand
- A vacuum with a soft brush attachment (never a stiff bristle head near stitching)
- Two or three high-GSM microfibre towels, kept separate from your paint-cleaning towels
- A horsehair or soft leather detailing brush for seams and piping
- A pH-balanced, solvent-free leather cleaner
- Foam applicator pads
The sequence that protects the finish
- Vacuum first, every time. Get into the seams, the base of the backrest, and around the headrest. Skipping this step means you’re rubbing grit into the surface during the next steps.
- Test on a hidden patch. Try any new cleaner on the underside of the headrest or the back of a rear seat first. Wait five minutes and check for colour transfer or a dull patch before going near the visible surfaces.
- Spray onto the towel, never onto the leather. Direct spraying pools liquid into seams and perforations, where it can sit against the foam backing and cause staining or mould over time.
- Agitate gently with the brush. Circular motions, light pressure. Leather isn’t carpet. It doesn’t need scrubbing.
- Wipe dry with a clean microfibre. Change towels once they’re saturated rather than pushing dirty residue back into the surface.
- Let it air cure. Crack a window or leave the doors open for 10 to 15 minutes before driving. This matters more on hot days, when trapped moisture combined with heat is a fast track to a musty smell.
Leather sits at a natural pH of around 4.5 to 5.0, close to the acidity of your own skin. Alkaline household cleaners, the kind sitting under most kitchen sinks, strip the natural acid mantle and leave the surface dry and prone to splitting. That’s the single biggest product mistake owners make, and it’s an easy one to avoid once you know what to look for on a label.
Three habits reliably shorten leather’s lifespan: spraying cleaner directly onto the seat, grabbing a generic multi-surface cleaner because it’s what’s already in the boot, and over-wetting perforated leather until moisture pools beneath the surface. Perforated seats in particular need a near-dry towel, not a damp one, because water finds its way through those holes and sits against the foam underneath. For a fuller walkthrough of the full interior sequence, Com’s step-by-step interior cleaning guide covers seats alongside carpets and trim.
Should you condition or protect your leather seats?
The single most common leather-care mistake is applying the wrong product to the wrong age of leather. Get this rule backwards and you can do more damage than doing nothing at all.
Most seats fitted in the last three years use a factory-applied protective coating, not raw, absorbent hide. Oil-based conditioners sit on top of that coating rather than soaking in, and that surface film attracts dust and grime while making the finish feel greasy within weeks. For newer leather, skip the conditioner entirely and reach for a water-based protectant or friction blocker instead. That’s the product category doing the real preventive work against dye transfer and abrasion.
Older leather, roughly three years and beyond, is a different story. The factory coating has worn thinner by then, and the hide underneath genuinely dries out. A light conditioning treatment every three to six months restores flexibility, and products with UV filters built in add a second layer of protection against sun damage.
Here’s the quick reference for telling the two categories apart:
- New/coated leather (under ~3 years): friction blocker or protective shield, no oils, reapply every 3 to 6 months.
- Older leather (~3+ years): proper conditioner with UV filters, applied every 3 to 6 months, cured overnight before the seat sees use.
- Over-conditioned leather looks and feels greasy, picks up dust almost immediately, and may darken slightly in patches. If you spot that, stop conditioning for a few months and let the surface breathe.
- Always test on an inconspicuous patch first, the same way you would with a cleaner.
Letting a conditioner or protectant cure overnight rather than driving off straight away matters more than most owners realise. Clothing friction within the first few hours can wipe off a large share of what you just applied, which means the whole treatment did almost nothing. Com’s practical guide to protecting car leather walks through product selection in more depth if you’re unsure which category your seats fall into.
Why does sun exposure crack leather seats fastest?
UV and heat are the single biggest cause of cracked leather, ahead of friction, ahead of dirt, ahead of poor cleaning habits combined. Prolonged sun exposure fades leather, dries it out, and eventually splits the surface, and a closed car parked in direct sun regularly reaches cabin temperatures well above the outside air.
The good news is that heat and UV are also the cheapest problems to solve.
- Use a full-width windscreen sunshade every time you park in open sun, not just on scorching days. Consistency beats intensity here.
- Park in shade or under cover whenever it’s an option, even if that means walking an extra block.
- Consider a heat-reflective shade for long stops, particularly if you’re leaving the car for hours at a shopping centre or airport.
- Look at ceramic or high-UV-block window tint. It filters infrared heat as well as UV, which lowers cabin temperature and slows fading at the same time. The trade-off is upfront cost and, depending on your state’s window tint laws, some restriction on how dark you can legally go.
Convertibles and cars with panoramic sunroofs face a tougher fight, since there’s less roof structure blocking direct sun even when parked. In those cases, a sunshade plus a UV-filtering conditioner on older leather is less of an upgrade and more of a baseline requirement.
Temperature control through shading and tint often does more heavy lifting than conditioning alone, because no amount of conditioner fully offsets daily exposure to 60 degree cabin heat. If you’re weighing up interior protection options more broadly, a comparison of interior ceramic coating is worth a read, since some coatings add a measure of UV resistance on top of their main job of repelling stains.
How do you stop the driver’s seat bolster from cracking?
Walk into any car more than five years old and the driver’s bolster, the raised side panel you brush against getting in and out, is almost always the first place cracking shows up. It’s simple physics: that panel takes repeated rubbing from denim, keys, and belt buckles thousands of times a year, while trapped grit works against it like sandpaper on every entry.
That combination of friction and skin oils breaks down the surface finish faster than any other seat area, which is exactly why bolsters deserve targeted attention rather than the same blanket treatment as the seat base.
A few tactics make a real difference on high-use vehicles:
- Apply a friction blocker specifically to bolster contact zones every three months, rather than waiting for the full seat’s protection cycle.
- On daily drivers or work vehicles, consider a thin neoprene or cloth entry cover just for the bolster. It’s not elegant, but it takes the abrasion instead of the leather.
- Keep a microfibre cloth within reach to wipe grit off jeans or boots before getting in, particularly after a beach day or a job site.
- Watch what you’re wearing. Heavy rivets, metal studs, and stiff raw denim all accelerate wear, and fresh dark denim can transfer dye onto lighter leather within a single sit. Clean any dye transfer immediately with your regular pH-balanced cleaner before it sets.
Pro Tip:If you notice the bolster feeling slightly stiffer or shinier than the rest of the seat, that’s the early warning sign, months before an actual crack appears. Treat it then, not after.
Can you fix small cracks in leather seats yourself?
Small, surface-level cracks are fixable at home. Structural splits, torn seams, and anything near a seat-heating element or side airbag are not, and trying to force a DIY fix in those cases usually makes the repair more expensive later.
Here’s the honest, ordered process for stabilising a small crack yourself:
- Clean the area thoroughly with your usual pH-balanced cleaner. Skip harsh solvents entirely. They can widen the crack or strip surrounding colour.
- Let it dry completely. Rushing this step traps moisture under any filler you apply next.
- Lightly sand the crack edges with a very fine grit sandpaper to smooth the lip and help filler bond.
- Apply flexible filler in thin layers, sanding lightly between each one. Building filler this way, rather than in one thick pass, is what stops the repair going brittle and failing again within months.
- Finish with colour-matched dye and a flexible sealant, letting each layer cure fully before the seat goes back into daily use.
Where a home kit reaches its limit is anything involving foam breakdown underneath the leather, tears longer than a few centimetres, or seam failures where stitching has pulled through. Genuine structural repair needs professional upholstery skills and equipment that a $30 repair kit simply isn’t built to deliver.
Use these criteria to decide whether to call a professional:
- Size: anything larger than a coin-sized crack is pushing past what filler layers can reliably hold.
- Structural damage: foam showing through, or the leather feeling loose over the frame, means the problem is beneath the surface.
- Integrated features: seats with heating elements or side airbags built into the bolster should go to a specialist. Puncturing a heating wire or interfering with airbag deployment is a real risk with DIY sanding and filling.
What does a professional detailer actually do differently?
A trained eye catches problems weeks or months before an untrained one would, and that head start is often the difference between a $50 protection treatment and a $600 repair.
A professional approach to leather starts with inspection, not product. Every seat gets checked for coating condition, existing wear patterns, and any early cracking around the bolsters and seat edges before a single cleaner touches the surface. That inspection determines the cleaning agent, whether the leather calls for a friction blocker or a full conditioning pass, and how long the seat needs to cure before it’s back in service.
Curing time is the step most DIY routines skip, and it’s the one that separates a treatment that lasts from one that wipes off within a fortnight. Professional leather protectants and ceramic coatings need controlled application and a proper cure window, sometimes several hours, to bond correctly to the surface rather than sit on top of it.
That’s also why Com offers a dedicated leather ceramic coating as a standalone service. It targets exactly the damage profile covered above: UV fade, oil breakdown from skin contact, and abrasion at high-friction points like the driver’s bolster. Rather than reapplying a conditioner every few months yourself, a cured ceramic layer gives the surface a harder, more UV-resistant shield that keeps doing the job in the background.
Do humidity and cold weather affect leather seats too?
Sun and heat get most of the attention, but humidity and cold both play a genuine role in how fast leather deteriorates.
High humidity, especially along the coast, creates the conditions for mould and mildew to take hold in seams and stitching, particularly if the cabin doesn’t get proper airflow after a clean or a wet day. That moisture doesn’t crack the leather directly, but it breaks down stitching and can leave dark spotting that’s difficult to fully remove. Cracking the windows for ventilation on humid days, and never leaving a car sealed up wet, goes a long way toward preventing it.
Cold weather works differently. Leather stiffens as temperature drops, and stiff leather is far less forgiving of the exact same stresses it shrugs off in warm weather. Getting into a cold car and immediately twisting into the seat, particularly onto a bolster that’s already showing early wear, puts more strain on the fibres than the same movement on a warm afternoon. Letting the cabin warm slightly before sitting hard into the seat, and being a touch gentler with cold leather generally, reduces that risk.
The seasonal pattern worth remembering: summer punishes leather through UV and heat, winter punishes it through stiffness and moisture. A conditioning or protection routine that only accounts for one season is only doing half the job.
What’s the right way to dry leather seats after cleaning?
Drying technique gets overlooked constantly, and it’s a bigger factor in long-term leather health than most owners assume.
The core rule: dry with a clean, dry microfibre immediately after any wet cleaning step, then let the seat air cure with a window cracked or a door open for 10 to 15 minutes before it’s back in regular use. Trapped moisture sitting against the surface, or worse, seeping through perforations into the foam underneath, is exactly how mould and unpleasant odours start.
Never use heat to speed the process along. A hairdryer or a heat gun feels like it should help, but rapid heat drying is one of the fastest ways to pull moisture out of the fibres too aggressively, leaving the surface brittle. Natural air drying, out of direct sun, is always the safer route.
Perforated seats need extra care. Water that finds its way through those small holes sits against the foam and can take days to fully evaporate on its own, which is exactly why the cleaning routine above calls for a near-dry towel rather than a wet one on perforated leather. If a seat does get properly soaked, whether from a spill or a wet dog jumping in, prop the door open and let it dry fully over several hours rather than closing the car up and hoping.
What common mistakes make leather seats crack faster?
Most premature cracking traces back to one of a handful of repeatable mistakes, not bad luck or bad leather.
Using the wrong cleaner tops the list. Grabbing a generic multi-surface spray because it’s already in the car, rather than a purpose-made pH-balanced leather cleaner, strips the natural acid balance and dries the surface out over repeated use.
Skipping the age rule is a close second. Conditioning newer, coated leather with an oil-based product leaves a greasy film that attracts dirt and does nothing to actually protect the surface, while leaving genuinely old, dry leather unconditioned lets it crack from the inside out.
Ignoring the bolsters until they’re already cracked is the third major pattern. By the time a crack is visible, the finish underneath has usually been thinning for months. Treating bolsters on their own three-month cycle, rather than waiting for the full-seat protection schedule, catches the problem earlier.
Rounding out the list: parking in direct sun without a shade out of habit rather than by choice, letting spills sit instead of blotting them immediately, and rushing a repair or protection product without letting it cure properly. Each one is a small habit, but they compound. A seat that gets every one of these wrong will show visible cracking years before an identical seat that gets the basics right.
What DIY repair kits work for minor leather damage?
For small, cosmetic cracks, a basic leather repair kit is genuinely worth keeping in the glovebox or garage. Look for a kit that includes flexible filler (not rigid resin, which cracks again almost immediately under seat flex), fine-grit sandpaper, colour-matched dye, and a flexible top sealant. Those four components cover the full repair sequence outlined earlier, from filling through to a durable, matching finish.
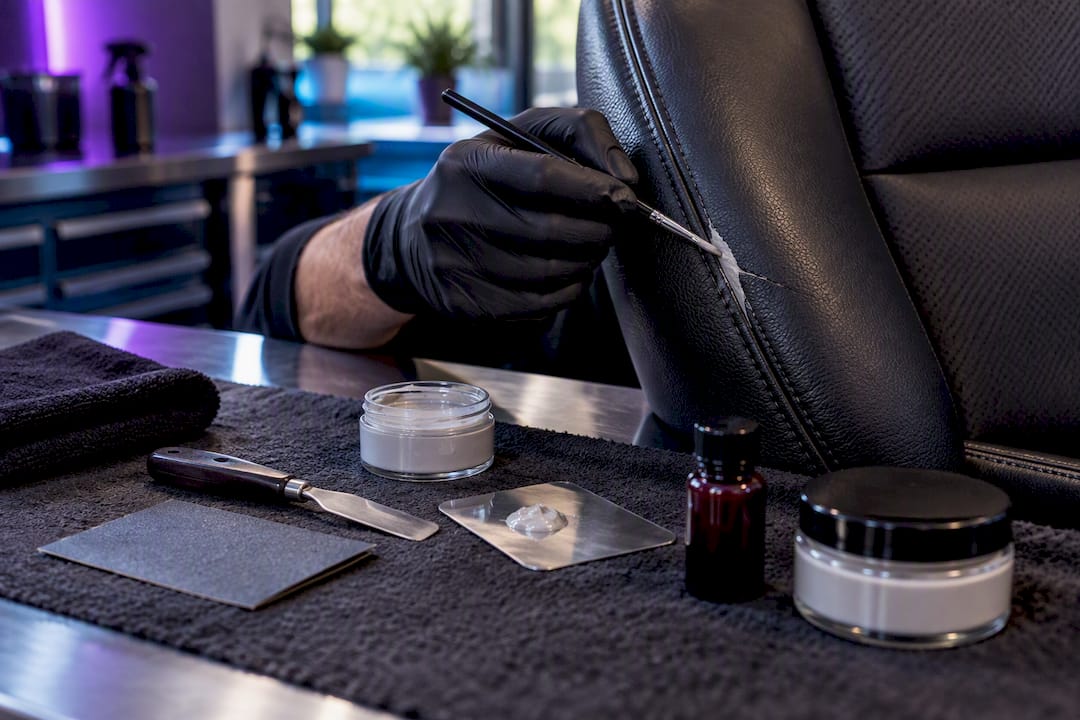
Applicator tools matter more than people expect. A fine detail brush or a small palette knife gives far more control over thin filler layers than trying to spread it with a finger or a cloth. Cheap kits often skimp here, and precise application is exactly what separates a repair you can’t spot from one that stands out under any decent light.
Colour matching is the step most DIY attempts fail at. Buy a dye that’s genuinely matched to your seat’s specific shade rather than a generic “black” or “tan”, since factory leather rarely matches an off-the-shelf colour exactly. Some kits include small mixing options to blend a closer match, which is worth the extra ten minutes.
Keep expectations realistic. These kits handle small, surface-level cosmetic cracks well. Anything involving structural foam damage, long tears, or failed stitching is outside what a filler-and-dye kit can genuinely fix, and that’s the point where a professional upholstery repair becomes the more sensible option rather than a second attempt at the same DIY fix.
What actually separates good leather care from wasted effort
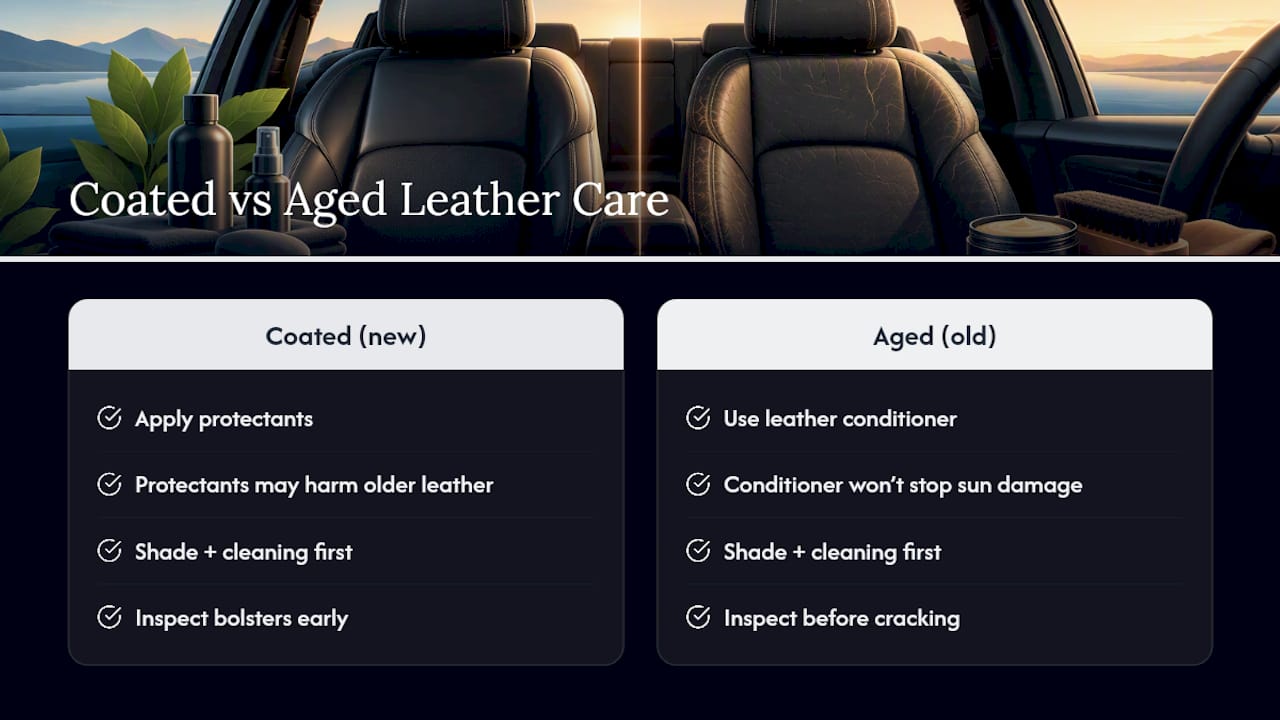
Most advice on preventing leather cracking treats every seat the same, and that’s the gap worth calling out. A three-month-old seat and an eight-year-old seat are facing entirely different failure modes, and a conditioner that helps one will actively hurt the other. The age rule, coated leather gets protectants, aged leather gets conditioner, is the single most useful thing in this entire guide, and it’s the detail most generic car care advice skips entirely.
The conventional wisdom oversells conditioning and undersells heat management. Owners reach for a bottle of conditioner because it feels like doing something, when a $40 sunshade used consistently prevents more long-term damage than any conditioning schedule alone. Prioritise the shade and the cleaning habit first. Layer in age-appropriate protection second. Treat conditioning as maintenance, not a cure for damage that’s already sun-driven.
If you take one thing from this: check your bolsters today, not when they crack.
— isaac’s
How Com can help prevent or repair cracked leather seats
DIY care handles a lot, but a proper professional pass gives leather a level of protection that’s difficult to replicate with bottled products alone, and it saves you the guesswork of matching product to leather age. Workshop-grade leather care can be brought to your preferred location without the need to book a slot at a shop and wait around.
If your leather is still relatively new and you want to get ahead of cracking before it starts, the Ultimate Protection Package covers long-term interior and paint protection in one booking, priced from $1,500 to $2,200 depending on your vehicle. For seats specifically, the standalone leather ceramic coating at $50 per seat gives coated leather a durable, UV-resistant shield without the guesswork of picking the right retail protectant.
If cracking or general wear has already set in, the Revival Detail (from $575 to $775) is built for exactly that kind of restoration work, while the Deluxe Detail (from $375 to $575) suits seats that just need a proper reset. Each professional service begins with an inspection of coating condition, wear patterns, and curing needs before any product is applied.
Get in touch for a tailored quote based on your seats’ age and condition, or book directly through the protection package page to lock in a slot.
Sources
- How to clean and protect leather car seats — LeatherCare
- How to clean and protect leather car seats — COLOURLOCK Australia
- How do you restore leather car seats? — AutoDetailPedia
FAQ
What should you put on leather seats to stop cracking?
It depends on the leather’s age. Newer, coated leather (under about three years) needs a water-based protectant or friction blocker, while older leather benefits from a proper conditioner with UV filters applied every three to six months. Never use petrol-based or silicone-heavy dressings on either.
Why do car leather seats crack?
Cracking comes from three compounding causes: UV and heat drying out the fibres, oils and sweat breaking down the surface finish, and trapped grit abrading the leather every time you sit down. Sun exposure is usually the single biggest driver since a closed cabin regularly reaches temperatures far above the outside air.
How do you stop leather from cracking further once it’s started?
Stop using oil-based conditioners if the leather is coated, switch to a pH-balanced cleaner and age-appropriate protectant, and start using a sunshade every time you park in the sun. For a driver’s bolster already showing wear, applying a friction blocker every three months slows further deterioration significantly.
How can you fix cracks in leather car seats yourself?
Small cracks can be stabilised by cleaning the area, lightly sanding the edges, and building flexible filler in thin layers finished with colour-matched dye and sealant. Larger tears, seam failures, or damage near seat-heating elements or airbags need a professional repair rather than a home kit. Com’s Revival Detail, priced from $575 to $775, covers this level of restoration work.