
Those tiny orange specks are almost always iron fallout, also known as rail dust: microscopic ferrous particles that land on your paint and rust in place. The fix is straightforward and doesn’t require repainting anything. Wash the car, apply a dedicated iron fallout remover, clay the surface if contamination remains, then protect the paint. Treat it soon rather than later, because embedded iron can pit the clear coat if left too long.
TL;DR:
- Iron fallout spots are caused by microscopic ferrous particles from sources like railway lines, brake dust, and industrial fallout, which embed in the paint’s clear coat.
- The most effective removal process is a sequence of washing, applying an iron fallout remover, claying, and protecting with wax or ceramic coating, conducted in that order.
- Chemical decontamination should always precede mechanical methods due to the chemistry: dissolving iron particles first prevents scratches and swirl marks.
- Immediate treatment, ideally within a week of spotting, can prevent oxidation from turning spots into pitting that damages the clear coat.
- Professional detailers include an isopropyl alcohol wipe-down after decontamination to ensure proper coating adhesion and long-term protection.
Table of Contents
- What causes orange spots on car paint
- How to check if it’s really iron fallout
- Removing orange spots: the safe step-by-step process
- Preventing orange spots from coming back
- What professional detailers do differently
- The priority order that actually protects your paint
- Get the fallout off before it gets worse
- Sources
- FAQ
What causes orange spots on car paint
Iron fallout gets its name because a huge share of it comes from railway lines. Brake dust from your own car and every other vehicle on the road, industrial fallout drifting from factories, and grinding or welding particles from nearby construction sites all behave the same way once they land on your paint. These are microscopic bits of iron and steel, hot enough or sharp enough to punch into the clear coat rather than sit on top of it, according to Auto Care HQ.
Once embedded, the metal starts oxidising. Iron plus moisture plus air equals rust, and that rust shows up as the orange or rust-brown speckling you’re staring at now. It’s the same chemistry as a rusty nail, just happening in miniature on your bonnet.
A few things make spots more obvious on some cars than others:
- Paint colour matters. White, silver and light grey show iron fallout far more readily than dark colours, simply because the contrast is higher, per Auto Care HQ.
- Panel position matters too. Rear bumpers, lower doors, wheel arches, and horizontal surfaces like the boot lid and roof collect the heaviest concentrations, since these are the panels most exposed to road spray and airborne dust, according to Detailed Image.
- Parking location matters most of all. Cars parked near railway corridors, industrial estates, or active building sites pick up fallout faster and in greater volume than cars parked elsewhere.
It helps to know what you’re not looking at. Surface dirt wipes away with a microfibre cloth and some quick-detail spray. Iron fallout doesn’t, because it’s sitting inside the clear coat, not on it. True bodywork rust, the kind eating through bare metal at a stone chip or scratch, is a different problem entirely and needs paint repair, not decontamination.
How to check if it’s really iron fallout
Before you reach for any chemical, run through a quick triage. It takes ten minutes and tells you whether this is a weekend job or a job for someone else.
- Wash the car first, then inspect it in shade. Dirt and grime can hide spots or make you think you’ve got more contamination than you do. Direct sun also makes it hard to judge colour changes later, so pick an overcast day or park in the shade.
- Run a gloved hand or a plastic sandwich bag over the panel. Iron fallout that’s properly bonded feels gritty, almost like fine sandpaper, even when the surface looks smooth. If you feel texture but see no dirt, that’s contamination sitting in the clear coat.
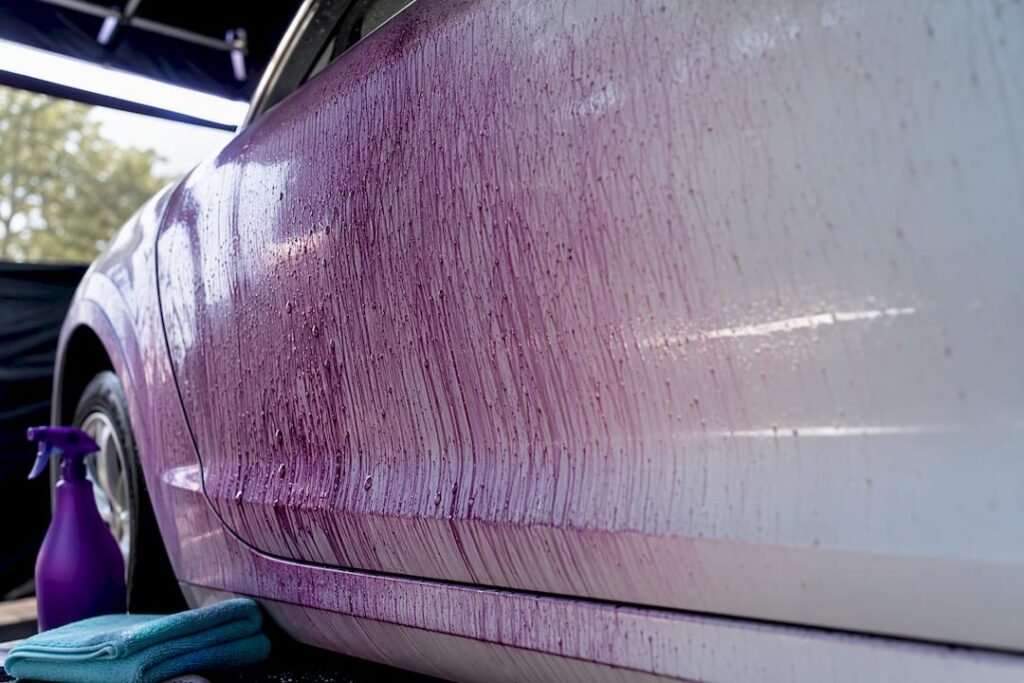
- Spot test a small panel with an iron remover. Spray a hidden section, such as behind a wheel arch, and watch for a purple or dark red colour change. That reaction confirms active ferrous contamination and tells you the product is working, according to Cali Auto Glass. Always follow the label’s dwell time and never let the product dry on the surface.
- Know when to stop and call a professional. Single-stage paint (common on older or classic vehicles), visible pitting, or fallout that covers most of the car rather than a few panels are all signs this has gone past a DIY afternoon.
Removing orange spots: the safe step-by-step process
This is the sequence detailers actually use, and it works because each stage does one job before the next stage starts. Skipping steps, especially the wash, just grinds contamination deeper into the paint.
Step 1: Pre-wash properly.
Use a two-bucket wash method with a dedicated wash mitt, rinse thoroughly, and dry with a clean microfibre towel. This clears loose grit, road film and general dirt so the iron remover only has to deal with actual iron fallout, not a layer of muck sitting on top of it.
Step 2: Apply a dedicated iron fallout remover.
Spray it on generously and evenly across the panel, working in the shade with the car cool to the touch. Watch for the purple or reddish colour change; that’s the product reacting with iron and dissolving the rust so it can be rinsed off rather than scrubbed off, per Cali Auto Glass. Follow the dwell time on the label exactly. The single biggest mistake here is letting the product sit too long or dry onto the panel, which can etch trim and, in some cases, mark the paint itself. Rinse thoroughly with a strong hose stream before it dries.
Step 3: Clay bar or clay mitt.
Chemical decontamination lifts most fallout, but some particles are mechanically bonded and need a physical pass to come free. Lubricate the panel with a clay lubricant or diluted detail spray and glide a clay bar or clay mitt over the surface using light pressure. Using clay after chemical decon rather than before means you need far less pressure, which cuts the risk of leaving fine scratches, according to DetailDIY. Check your progress with the plastic-bag test, running a bag over your gloved hand across the paint; once it glides smoothly with no grittiness, decontamination is done.
Step 4: Polish out any marring, if needed.
Claying can leave faint swirl marks on softer clear coats. A light machine polish restores clarity and gloss. Skip this step on single-stage paint or hand it to a professional, since there’s no clear coat buffer to protect the colour layer underneath if you get it wrong.
Step 5: Protect the paint.
Finish with wax, a synthetic sealant, or a ceramic coating. This isn’t optional if you want the result to last. Bare, freshly decontaminated paint is actually more prone to picking up new contamination than paint with a protective layer, simply because there’s nothing between the surface and the next round of airborne iron.
- Work in the shade, never in direct sun or on a hot panel.
- Wear nitrile gloves and eye protection when handling iron removers.
- Keep chemical decon products off trim, rubber seals and glass where possible, and rinse any overspray promptly.
Pro Tip: Keep a small offcut of clear coat or a hidden panel section as your test zone. Spray your iron remover there first every time you buy a new bottle, since formulations vary and dwell times aren’t always identical between brands.
Preventing orange spots from coming back
Most drivers perform decontamination several times per year. If you park near a railway corridor, live close to heavy industry, or drive through construction zones regularly, more frequent treatment helps keep fallout from building up between washes.
What you put on the paint afterwards changes how fast fallout sticks in the first place:
- Traditional wax offers modest, short-lived protection and needs reapplying every few weeks.
- Synthetic sealants last several months and create a slicker surface that iron particles struggle to bond to.
- Ceramic coatings go furthest, forming a hard, slick layer that dramatically reduces how easily ferrous particles embed, and they’re the standard prep surface pros favour for long-term protection. Our guide to protecting your paint breaks down how each option holds up over time, and Diamond Brite’s maintenance guide is a solid resource if you’ve already had a ceramic coating applied and want to keep it performing.
A few habits matter almost as much as the products. Avoid parking directly beside train lines or active building sites where you can help it, and if you’ve just driven through a dusty industrial route or a long stretch near rail infrastructure, a quick rinse and spot check when you get home stops fallout from having time to set in.
What professional detailers do differently
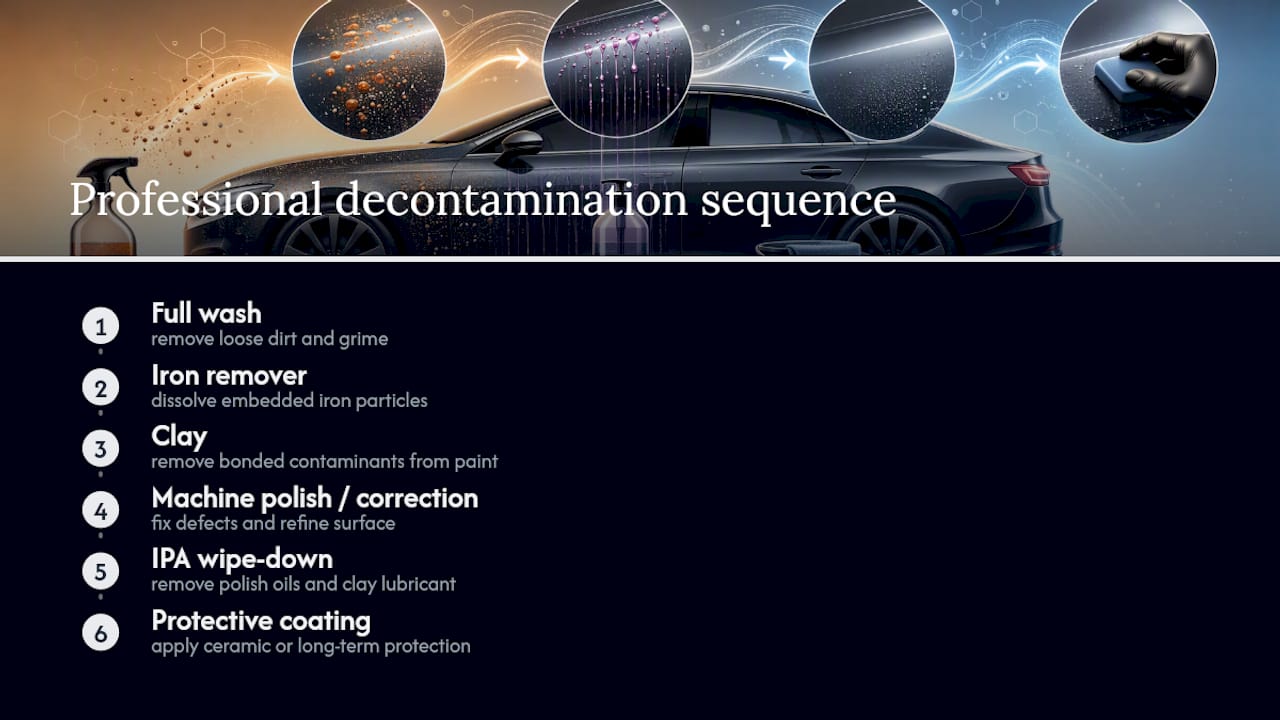
Professional decontamination follows the same broad sequence as the DIY version, just with tighter execution: full wash, iron remover, clay, machine polish or correction, an isopropyl alcohol wipe-down, then a protective coating. That IPA step is the detail most DIYers skip, and it matters, because any leftover polish oils or clay lubricant will stop a ceramic coating from bonding properly.
That’s also the exact reason pros insist on full decontamination before any ceramic coating application. Embedded iron particles create tiny high points under the coating, and those spots are where premature coating failure starts, according to Cali Auto Glass. Skipping the prep to save time usually means redoing the coating within a year. This exact sequence is used as part of cut and polish and ceramic coating services, treating iron removal as a required prep stage rather than an optional add-on before any long-term protective coating goes on.
The priority order that actually protects your paint
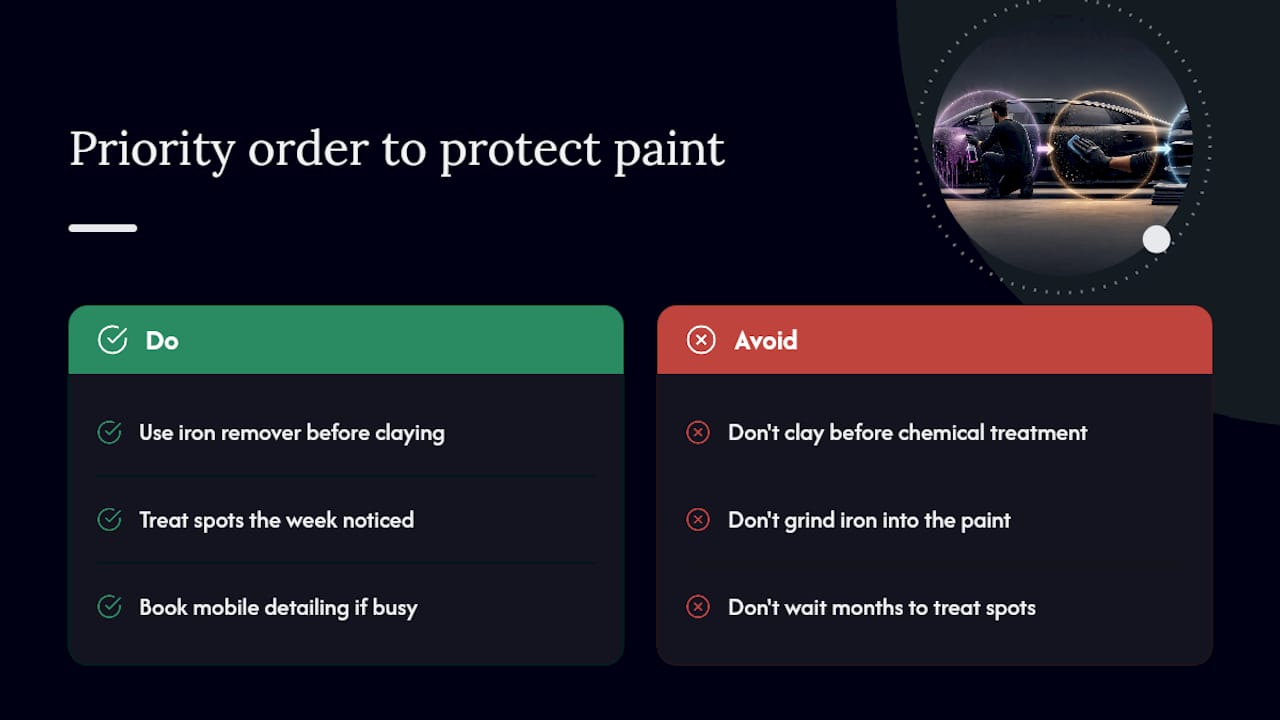
Chemical decontamination should always come before mechanical decontamination. That order matters more than most owners realise: a good iron remover dissolves the bond an embedded particle has with your clear coat, so claying afterwards needs almost no pressure to finish the job. Reverse that order and you’re grinding iron fragments across the paint with a clay bar, which is how swirl marks happen.
Treat orange spots the week you notice them, not the season you get around to it. Left alone, embedded iron keeps oxidising and can eventually pit the clear coat, turning a ten-minute chemical treatment into a correction job. If a weekend of washing, spraying and claying isn’t realistic with your schedule, a mobile detailing service that comes to your driveway is a genuinely practical shortcut, not a luxury.
— isaac’s
Get the fallout off before it gets worse
Iron fallout doesn’t fix itself, and it rarely stays the same size. The longer those particles sit in your clear coat, the more they oxidise and the closer you get to actual pitting rather than surface discolouration. If the wash-and-clay approach sounds like more time than you’ve got this month, mobile decontamination services are available that bring the full wash, iron remover, clay and protection sequence to your home, workplace, or wherever your car happens to be parked. Check the wash menu for packages that include iron removal and paint protection, so the spots don’t just come back in three months.
Sources
- How to Remove Orange Spots on Car Paint (Full Guide) | Auto Care HQ
- What is rail dust and how do you remove it? — Detailed Image Ask a Pro
- Orange Rust Spots on Paint? That Is Iron Fallout — Here Is How to Fix It | Cali Auto Glass
- What is rail dust? Prevention & removal | DetailDIY
FAQ
What are the orange dots on my car paint?
They’re almost always iron fallout, tiny particles of iron or steel from brake dust, rail lines or industrial sources that have embedded in the clear coat and started to rust.
What are the small rust-coloured dots on my car paint?
Same cause as orange dots: embedded ferrous particles oxidising in place. The colour and size vary slightly depending on how long the contamination has been sitting and how concentrated it is.
How do I fix tiny rust spots on car paint?
Wash the car, apply a dedicated iron fallout remover and watch for the purple colour change, then clay the panel if any grittiness remains, and finish with wax, sealant or a ceramic coating.
Will clear coat fix orange peel or orange spots?
No. Clear coat is a fixed layer, not a treatment; it won’t dissolve or push out embedded iron. Orange spots need chemical decontamination and, if necessary, claying, not a fresh clear coat application.